This is the multi-page printable view of this section. .
Get Started
- 1: Single-Node Installation
- 2: Docker Deployment
- 3: Web Interface
- 4: Getting Started with PostgreSQL
- 5: Customize Pigsty with Configuration
- 6: Run Playbooks with Ansible
- 7: Offline Installation
- 8: Slim Installation
- 9: Security Recommendations
Pigsty uses a scalable architecture design, suitable for both large-scale production environments and single-node development/demo environments. This guide focuses on the latter.
If you intend to learn about Pigsty, you can start with the Quick Start single-node deployment. A Linux virtual machine with 1C/2G is sufficient to run Pigsty.
You can use a Linux MiniPC, free/discounted virtual machines provided by cloud providers, Windows WSL, or create a virtual machine on your own laptop for Pigsty deployment. Pigsty provides out-of-the-box Vagrant templates and OpenTofu templates to help you provision Linux VMs with one click locally or in the cloud.
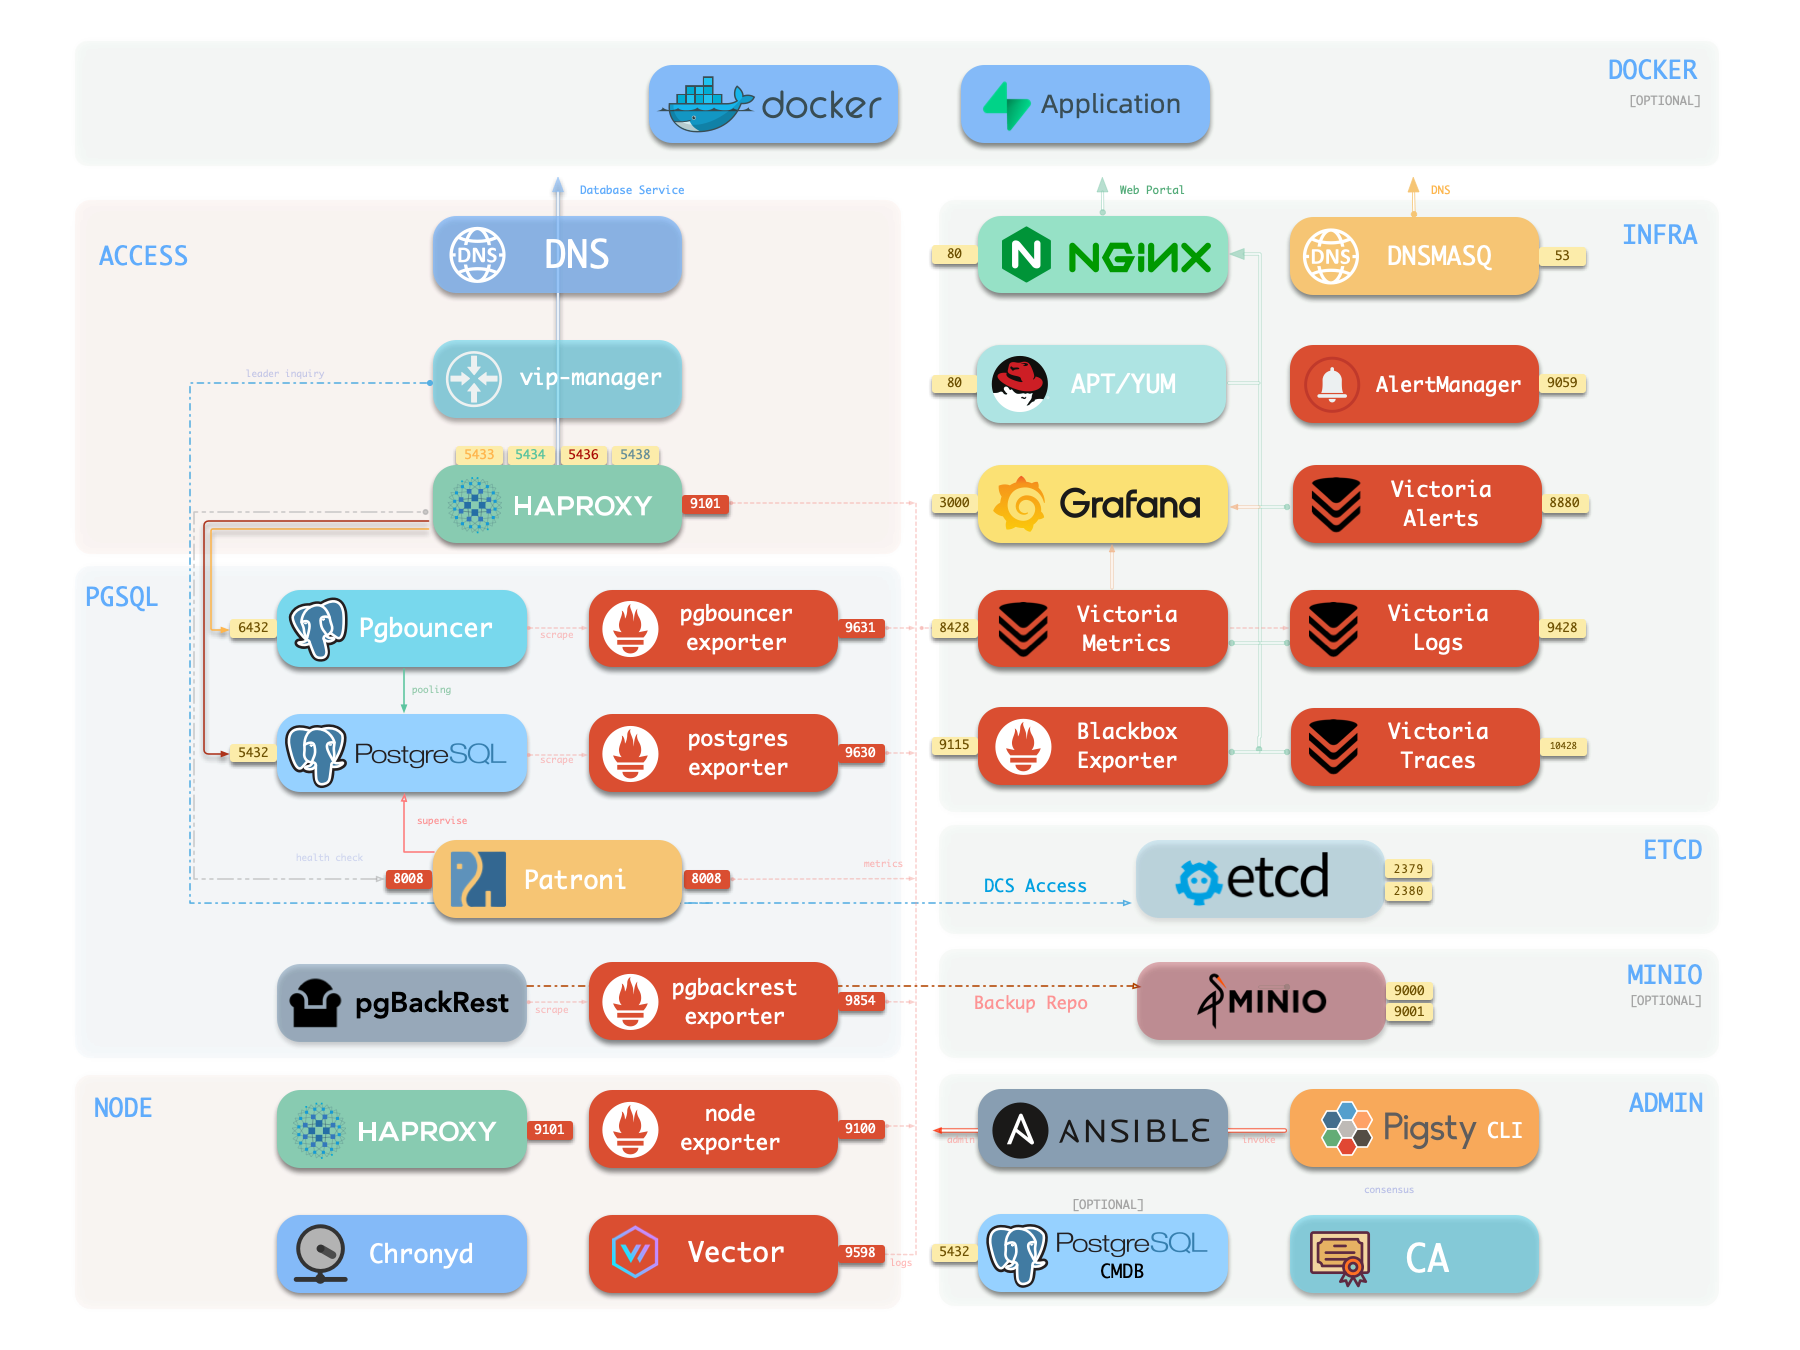
The single-node version of Pigsty includes all core features: 575 PG extensions, self-contained Grafana/Victoria monitoring, IaC provisioning capabilities, and local PITR point-in-time recovery. If you have external object storage (for PostgreSQL PITR backup), then for scenarios like demos, personal websites, and small services, even a single-node environment can provide a certain degree of data persistence guarantee. However, single-node cannot achieve High Availability—automatic failover requires at least 3 nodes.
If you want to install Pigsty in an environment without internet connection, please refer to the Offline Install mode. If you only need the PostgreSQL database itself, please refer to the Slim Install mode. If you are ready to start serious multi-node production deployment, please refer to the Deployment Guide.
Quick Start
Prepare a node with compatible Linux system, and execute as an admin user with passwordless ssh and sudo privileges:
Yes, it’s that simple. You can use pre-configured templates to bring up Pigsty with one click without understanding any details.
Next, you can explore the Graphical User Interface, access PostgreSQL database services; or perform configuration customization and execute playbooks to deploy more clusters.
1 - Single-Node Installation
This is the Pigsty single-node install guide Single Node. For multi-node HA production deployment, refer to the Deployment docs.
Pigsty single-node installation consists of three steps: Install, Configure, and Deploy.
Summary
Prepare a node with compatible OS, and run as an admin user with nopass ssh and sudo:
Choose a Pigsty download mirror:
This command runs the install script, downloads and extracts Pigsty source to your home directory and installs dependencies. Then complete Configure and Deploy:
Enter the Source Directory
Generate the Inventory
Skip this step if you already have a prepared pigsty.yml.
Run the Deployment Playbook
After installation, access the Web UI via IP/domain + port 80/443 through Nginx,
and access the default PostgreSQL service via port 5432.
The complete process takes 3–10 minutes depending on server specs/network. Offline installation speeds this up significantly; for monitoring-free setups, use Slim Install for even faster deployment.
Video Example: Online Single-Node Installation (Debian 13, x86_64)
demo/install-hero.cast — /demo/install-hero.cast
Prepare
Installing Pigsty involves some preparation work. Here’s a checklist.
For single-node installations, many constraints can be relaxed—typically you only need to know your IP address. If you don’t have a static IP, use 127.0.0.1.
| Item | Requirement | Item | Requirement |
|---|---|---|---|
| Node | 1-node, at least 1C2G, no upper limit |
Disk | /data mount point, xfs recommended |
| OS | Linux x86_64 / aarch64, EL/Debian/Ubuntu |
Network | Static IPv4; single-node without fixed IP can use 127.0.0.1 |
| SSH | nopass SSH login via public key |
SUDO | sudo privilege, preferably with nopass option |
Typically, you only need to focus on your local IP address—as an exception, for single-node deployment, use 127.0.0.1 if no static IP available.
Install
Use the following commands to auto-install Pigsty source to ~/pigsty (recommended). Deployment dependencies (Ansible) are installed automatically.
Choose a Pigsty download mirror:
If you prefer not to run a remote script, you can manually download or clone the source. When using git, always checkout a specific version before use.
For manual download/clone installations, run the bootstrap script to install Ansible and other dependencies. You can also install them yourself.
Configure
In Pigsty, deployment blueprints are defined by the inventory, the pigsty.yml configuration file. You can customize through declarative configuration.
Pigsty provides the configure script as an optional configuration wizard,
which generates an inventory with good defaults based on your environment and input:
The generated config file is at ~/pigsty/pigsty.yml by default. Review and customize as needed before installation.
Many configuration templates are available for reference. You can skip the wizard and directly edit pigsty.yml:
The output below is from the current main branch (v5.0.0-preview). If you install another version, the first line reports that version.
Common configure Arguments
-i | --ip,The primary private IP of the current host, used to replace the
10.10.10.10placeholder in the inventory.-c | --conf,A configuration template name relative to
conf/, without the.ymlsuffix.-v | --version,PostgreSQL major version
14through19; PG19 is Beta, so use the dedicatedpg19template.-r | --region, ,Upstream repository region for faster downloads:
default,china, oreurope.-n | --non-interactive, ,Use command-line arguments for the primary IP and skip the interactive wizard.
-x | --proxy, ,Use current environment variables to configure
proxy_env.
If your machine has multiple IPs bound, use -i|--ip <ipaddr> to explicitly specify the primary IP, or provide it in the interactive prompt.
The script replaces the placeholder 10.10.10.10 with your node’s primary IPv4 address. Choose a static IP; do not use public IPs.
We strongly recommend modifying default passwords and credentials in the config file before installation. See Security Recommendations for details.
Deploy
Pigsty’s deploy.yml playbook applies the blueprint from Configure to target nodes.
When you see pgsql init done, PLAY RECAP and similar output at the end, installation is complete!
Upstream repos used by Pigsty (like Linux/PGDG repos) can sometimes enter a broken state due to improper updates, causing deployment failures (this has happened multiple times)! You can wait for upstream fixes or use pre-made offline packages to solve this.
Warning: Running deploy.yml again on an existing deployment may restart services and overwrite configurations!
Interface
After single-node installation, you typically have four modules installed on the current node:
PGSQL, INFRA, NODE, and ETCD.
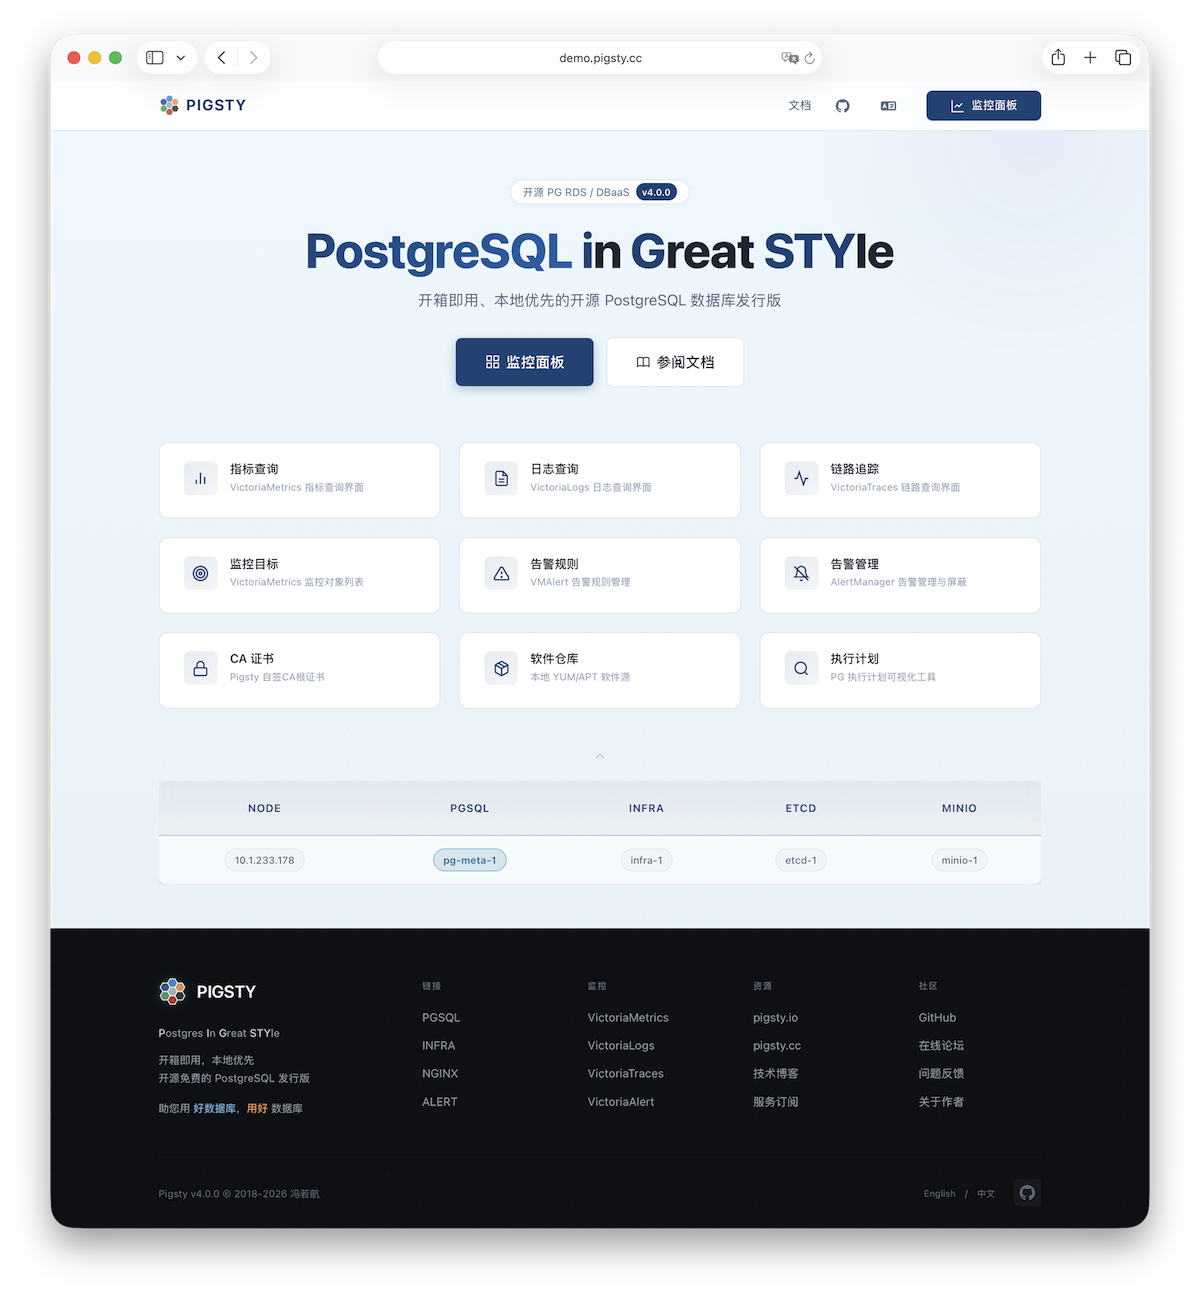
The INFRA module provides a graphical management interface, accessible via Nginx on ports 80/443.
The PGSQL module provides a PostgreSQL database server, listening on 5432, also accessible via Pgbouncer/HAProxy proxies.
More
Use the current node as a base to deploy and monitor more clusters: add cluster definitions to the inventory and run:
Most modules require the NODE module installed first. See available modules for details:
2 - Docker Deployment
Pigsty is designed for native Linux, but can also run in Linux containers with systemd. If you don’t have native Linux (e.g., macOS or Windows), use Docker to spin up a local single-node Pigsty for testing.
Quick Start
Enter the docker/ dir in Pigsty source and launch with one command:
After deployment, access services:
| Service | URL / Command | Credentials |
|---|---|---|
| SSH | ssh root@localhost -p 2222 |
Password: pigsty |
| Web Portal | http://localhost:8080 | - |
| Grafana | http://localhost:8080/ui | admin / grafana_admin_password |
| PostgreSQL | psql 'postgres://dbuser_dba:<pg_admin_password>@localhost:5432/postgres' |
pg_admin_password |
make launch runs ./configure -g internally to generate random passwords. You can check them with:
Web Portal and PostgreSQL are only available after Deployment (./deploy.yml) completes.
Prepare
Docker deployment requires:
| Item | Requirement | Item | Requirement |
|---|---|---|---|
| Docker | Docker 20.10+ (Desktop or CE) | CPU | At least 1 core |
| RAM | At least 2GB | Disk | At least 20GB free |
Ensure default host ports (2222/8080/8443/5432) are available, or edit .env first.
- Quick Pigsty experience on macOS/Windows without native Linux
- Learning and testing Pigsty features, dev and debug
- Quick local PostgreSQL dev environment
- Production: Container perf and stability inferior to native Linux
- HA Clusters: Docker single-node mode can’t achieve multi-node HA
- Large Scale: Use native Linux VMs or physical machines
Image
Pigsty provides an out-of-the-box Docker image on Docker Hub.
| Image | Pull | Size | Contents |
|---|---|---|---|
pgsty/pigsty |
~500MB | 1.3GB | Debian 13 + systemd + SSH + pig + Ansible |
- Supports both amd64 (x86_64) and arm64 (Apple Silicon, AWS Graviton)
- Image tags follow Pigsty versions. The Docker configuration on the current
mainbranch and the site baseline both usev5.0.0-preview; verify that the matching remote image exists before pulling or deploying. - Pre-configured with docker template, ready to run
./deploy.yml
Built on Debian 13 (Trixie), pre-installed with pig CLI and Ansible, Pigsty source already initialized.
Launch
Pigsty provides out-of-the-box Docker support in the docker/ source directory.
Simplest way is make launch, which auto-completes: start container, generate config, and deploy:
Or step by step for inspection at each stage:
To build locally instead of pulling from Docker Hub:
Config
Customize image version and port mappings via .env:
Port Mapping:
| Env Var | Default | Container | Description |
|---|---|---|---|
PIGSTY_VERSION |
v4.5.0 |
- | Current main source default; verify the remote tag separately |
PIGSTY_SSH_PORT |
2222 |
22 | SSH access port |
PIGSTY_HTTP_PORT |
8080 |
80 | Nginx HTTP port |
PIGSTY_HTTPS_PORT |
8443 |
443 | Nginx HTTPS port |
PIGSTY_PG_PORT |
5432 |
5432 | PostgreSQL port |
Override via env vars if defaults are occupied:
Commands
Pigsty Docker provides Makefile commands for container and image management.
Docker Compose
Recommended way to run:
Container Access
Image Build
Image Management
Cleanup
The current Makefile no longer provides a countdown prompt. After removing the container, make purge runs rm -rf -- ./data directly. Verify the current directory and target data first, and back it up when necessary.
Manual Run
If you prefer docker run over Docker Compose:
Or use Makefile’s make run:
How It Works
Pigsty Docker image is based on Debian 13 (Trixie) with systemd as init.
Service management inside container stays consistent with native Linux via systemctl.
Key features:
- systemd support: Full systemd for proper service management
- SSH access: Pre-configured SSH, root password is
pigsty - Privileged mode: Requires
--privilegedfor systemd - Data persistence: Via
/datavolume mount - Pre-installed: pig CLI + Ansible, Pigsty source initialized
Image build executes these init steps:
Running ./configure with -c docker applies the Docker-optimized config template:
- Uses
127.0.0.1as default IP - Tuned for container environment
FAQ
Container won’t start
Ensure Docker is properly installed with sufficient resources. On Docker Desktop, allocate at least 2GB RAM. Check for port conflicts on 2222, 8080, 8443, 5432.
Can’t access services
Web Portal and PostgreSQL only available after deployment. Ensure ./deploy.yml finished successfully.
Use make status to check service status.
Port conflicts
Override via .env or env vars:
Data persistence
Container data mounted to ./data. To wipe and start fresh:
macOS performance
On macOS with Docker Desktop, performance is worse than native Linux due to virtualization overhead. Expected—Docker deployment is for dev/testing. For production, use native Linux installation.
More
- Docker Hub: https://hub.docker.com/r/pgsty/pigsty
- Source Directory: https://github.com/pgsty/pigsty/tree/main/docker
- Quick Start: Native Linux Installation
- Offline Installation: Offline
- Production Deployment: Deployment Guide
3 - Web Interface
After single-node installation, you’ll have the INFRA module installed on the current node, which includes an out-of-the-box Nginx web server.
The default server configuration provides a WebUI graphical interface for displaying monitoring dashboards and unified proxy access to other component web interfaces.
Access
You can access this graphical interface by entering the deployment node’s IP address in your browser. By default, Nginx serves on standard ports 80/443.
| Direct IP Access | Domain (HTTP) | Domain (HTTPS) | Demo |
|---|---|---|---|
http://10.10.10.10 |
http://i.pigsty |
https://i.pigsty |
https://demo.pigsty.io |
Monitoring
To access Pigsty’s monitoring system dashboards (Grafana), visit the /ui endpoint on the server.
| Direct IP Access | Domain (HTTP) | Domain (HTTPS) | Demo |
|---|---|---|---|
http://10.10.10.10/ui |
http://i.pigsty/ui |
https://i.pigsty/ui |
https://demo.pigsty.io/ui |
If your service is exposed to Internet or office network, we recommend accessing via domain names and enabling HTTPS encryption—only minimal configuration is needed.
Endpoints
By default, Nginx exposes the following endpoints via different paths on the default server at ports 80/443:
| Endpoint | Component | Native Port | Description | Public Demo |
|---|---|---|---|---|
/ |
Nginx | 80/443 |
Homepage, local repo, file service | demo.pigsty.io |
/ui/ |
Grafana | 3000 |
Grafana dashboard portal | demo.pigsty.io/ui/ |
/vmetrics/ |
VictoriaMetrics | 8428 |
Time series database Web UI | demo.pigsty.io/vmetrics/ |
/vlogs/ |
VictoriaLogs | 9428 |
Log database Web UI | demo.pigsty.io/vlogs/ |
/vtraces/ |
VictoriaTraces | 10428 |
Distributed tracing Web UI | demo.pigsty.io/vtraces/ |
/vmalert/ |
VMAlert | 8880 |
Alert rule management | demo.pigsty.io/vmalert/ |
/alertmgr/ |
AlertManager | 9059 |
Alert management Web UI | demo.pigsty.io/alertmgr/ |
/blackbox/ |
Blackbox | 9115 |
Blackbox exporter | |
/haproxy/* |
HAProxy | 9101 |
Load balancer admin Web UI | |
/pev |
PEV2 | 80 |
PostgreSQL execution plan visualizer | demo.pigsty.io/pev |
/nginx |
Nginx | 80 |
Nginx status page (for metrics) |
Domain Access
If you have your own domain name, you can point it to Pigsty server’s IP address to access various services via domain.
If you want to enable HTTPS, you should modify the home server configuration in the infra_portal parameter:
You can run make cert command after deployment to apply for a free Let’s Encrypt certificate for the domain.
If you don’t define the certbot field, Pigsty will use the local CA to issue a self-signed HTTPS certificate by default.
In this case, you must first trust Pigsty’s self-signed CA to access normally in your browser.
You can also mount local directories and other upstream services to Nginx. For more management details, refer to INFRA Management - Nginx.
4 - Getting Started with PostgreSQL
PostgreSQL (abbreviated as PG) is the world’s most advanced and popular open-source relational database. Use it to store and retrieve multi-modal data.
This guide is for developers with basic Linux CLI experience but not very familiar with PostgreSQL, helping you quickly get started with PG in Pigsty.
We assume you’re a personal user deploying in the default single-node mode. For prod multi-node HA cluster access, refer to Prod Service Access.
Basics
In the default single-node installation template, you’ll create a PostgreSQL database cluster named pg-meta on the current node, with only one primary instance.
PostgreSQL listens on port 5432, and the cluster has a preset database meta available for use.
After installation, exit the current admin user ssh session and re-login to refresh environment variables.
Then simply type pp and press Enter to access the database cluster via the psql CLI tool (p is the shortcut for the pig CLI):
You can also switch to the postgres OS user and execute psql directly to connect to the default postgres admin database.
Connecting to Database
To access a PostgreSQL database, use a CLI tool or graphical client and fill in the PostgreSQL connection string:
Some drivers and tools may require you to fill in these parameters separately. The following five are typically required:
| Parameter | Description | Example Value | Notes |
|---|---|---|---|
host |
Database server address | 10.10.10.10 |
Replace with your node IP or domain; can omit for localhost |
port |
Port number | 5432 |
PG default port, can be omitted |
username |
Username | dbuser_dba |
Pigsty default database admin |
password |
Password | DBUser.DBA |
Pigsty default admin password (change this!) |
dbname |
Database name | meta |
Default template database name |
For personal use, you can directly use the Pigsty default database superuser dbuser_dba for connection and management. The dbuser_dba has full database privileges.
By default, if you specified the configure -g parameter when configuring Pigsty, the password will be randomly generated and saved in ~/pigsty/pigsty.yml:
Default Accounts
Pigsty’s default single-node template presets the following database users, ready to use out of the box:
| Username | Password | Role | Purpose |
|---|---|---|---|
dbuser_dba |
DBUser.DBA |
Superuser | Database admin (change this!) |
dbuser_meta |
DBUser.Meta |
Business admin | App R/W (change this!) |
dbuser_view |
DBUser.Viewer |
Read-only user | Data viewing (change this!) |
For example, you can connect to the meta database in the pg-meta cluster using three different connection strings with three different users:
Note: These default passwords are automatically replaced with random strong passwords when using configure -g. Remember to replace the IP address and password with actual values.
Using CLI Tools
psql is the official PostgreSQL CLI client tool, powerful and the first choice for DBAs and developers.
On a server with Pigsty deployed, you can directly use psql to connect to the local database:
After successful connection, you’ll see a prompt like this:
Common psql Commands
After entering psql, you can execute SQL statements or use meta-commands starting with \:
| Command | Description | Command | Description |
|---|---|---|---|
Ctrl+C |
Interrupt query | Ctrl+D |
Exit psql |
\? |
Show all meta commands | \h |
Show SQL command help |
\l |
List all databases | \c dbname |
Switch to database |
\d table |
View table structure | \d+ table |
View table details |
\du |
List all users/roles | \dx |
List installed extensions |
\dn |
List all schemas | \dt |
List all tables |
Executing SQL
In psql, directly enter SQL statements ending with semicolon ;:
Using Graphical Clients
If you prefer graphical interfaces, here are some popular PostgreSQL clients:
Grafana
Pigsty’s INFRA module includes Grafana with a pre-configured PostgreSQL data source (Meta).
You can directly query the database using SQL from the Grafana Explore panel through the browser graphical interface, no additional client tools needed.
Grafana’s default username is admin, and the password can be found in the grafana_admin_password field in the inventory (default pigsty).
DataGrip
DataGrip is a professional database IDE from JetBrains, with powerful features. IntelliJ IDEA’s built-in Database Console can also connect to PostgreSQL in a similar way.
DBeaver
DBeaver is a free open-source universal database tool supporting almost all major databases. It’s a cross-platform desktop client.
pgAdmin
pgAdmin is the official PostgreSQL-specific GUI tool from PGDG, available through browser or as a desktop client.
Pigsty provides a configuration template for one-click pgAdmin service deployment using Docker in Software Template: pgAdmin.
Viewing Monitoring Dashboards
Pigsty provides many PostgreSQL monitoring dashboards, covering everything from cluster overview to single-table analysis.
We recommend starting with PGSQL Overview. Many elements in the dashboards are clickable, allowing you to drill down layer by layer to view details of each cluster, instance, database, and even internal database objects like tables, indexes, and functions.
Trying Extensions
One of PostgreSQL’s most powerful features is its extension ecosystem. Extensions can add new data types, functions, index methods, and more to the database.
Pigsty provides 575 extensions covering 16 major categories including time-series, geographic, vector, and full-text search, installable with one click.
Start with three commonly used extensions, then install more extensions such as timescaledb as needed.
postgis: Geographic information system for processing maps and location data (installed by default)pgvector: Vector database supporting AI embedding vector similarity search (installed by default)timescaledb: Time-series database for efficient storage and querying of time-series data (optional install)
Next Steps
Congratulations on completing the PostgreSQL basics! Next, you can start configuring and customizing your database.
5 - Customize Pigsty with Configuration
Besides using the configuration wizard to auto-generate configs, you can write Pigsty config files from scratch. This tutorial guides you through building a complex inventory step by step.
If you define NODE, INFRA, ETCD, MINIO, and PGSQL in the inventory upfront, deploy.yml can deploy this core path in one run—but it hides the details. Optional modules such as Docker, Redis, Kafka, native MySQL, JUICE, and VIBE require their own playbooks.
This doc breaks down all modules and playbooks, showing how to incrementally build from a simple config to a complete deployment.
Minimal Configuration
The simplest valid config only defines the admin_ip variable—the IP address of the node where Pigsty is installed (admin node):
This config deploys nothing, but running ./deploy.yml generates a self-signed CA in files/pki/ca for issuing certificates.
For convenience, you can also set region to specify which region’s software mirrors to use (default, china, europe).
Add Nodes
Pigsty’s NODE module manages cluster nodes. Any IP address in the inventory will be managed by Pigsty with the NODE module installed.
We added two global parameters:
node_repo_modules specifies repos to add;
region specifies which region’s mirrors to use.
These parameters enable the node to use correct repositories and install required packages. The NODE module offers many customization options: node names, DNS, repos, packages, NTP, kernel params, tuning templates, monitoring, log collection, etc. Even without changes, the defaults are sufficient.
Run deploy.yml or more precisely node.yml to bring the defined node under Pigsty management.
Add Infrastructure
A full-featured RDS cloud database service needs infrastructure support: monitoring (metrics/log collection, alerting, visualization), NTP, DNS, and other foundational services.
Define a special group infra to deploy the INFRA module:
We also assigned an identity parameter: infra_seq to distinguish nodes in multi-node HA INFRA deployments.
Run infra.yml to install INFRA **](/docs/infra/) and [**NODE modules on 10.10.10.10:
demo/infra.cast — /demo/infra.cast
NODE module is implicitly defined as long as an IP exists. NODE is idempotent—re-running has no side effects.
After completion, you’ll have complete observability infrastructure and node monitoring, but PostgreSQL database service is not yet deployed.
If your goal is just to set up this monitoring system (Grafana + Victoria), you’re done! The infra template is designed for this.
Everything in Pigsty is modular: you can deploy only monitoring infra without databases;
or vice versa—run HA PostgreSQL clusters without infra—Slim Install.
Deploy Database Cluster
To provide PostgreSQL service, install the PGSQL` module and its dependency ETCD—just two lines of config:
We added two new groups: etcd and pg-meta, defining a single-node etcd cluster and a single-node PostgreSQL cluster.
Use ./deploy.yml to converge the defined modules in the core path again, or deploy incrementally:
PGSQL depends on ETCD for HA consensus, so install ETCD first. After completion, you have a working PostgreSQL service!
| ID | NODE | INFRA | ETCD | PGSQL | Description |
|---|---|---|---|---|---|
| 1 | 10.10.10.10 |
infra-1 |
etcd-1 |
pg-meta-1 |
Add etcd and PostgreSQL cluster |
We used node.yml, infra.yml, etcd.yml, and pgsql.yml to deploy all four core modules on a single machine.
Define Databases and Users
In Pigsty, you can customize PostgreSQL cluster internals like databases and users through the inventory:
pg_users: Defines a new userdbuser_metawith passwordDBUser.Metapg_databases: Defines a new databasemetawith Pigsty CMDB schema (optional) andvectorextension
Pigsty offers rich customization parameters covering all aspects of databases and users.
If you define these parameters upfront, they’re automatically created during ./pgsql.yml execution.
For existing clusters, you can incrementally create or modify users and databases:
Configure PG Version and Extensions
You can install different major versions of PostgreSQL, and up to 575 extensions. Let’s remove the current default PG 18 and install PG 16:
We can customize parameters to install and enable common extensions by default: timescaledb, postgis, and pgvector:
pg_extensions: Installtimescaledb,postgis,pgvectorextensions.pg_libs: Configure loadingtimescaledb,pg_stat_statements,auto_explaindynamic libraries.pg_databases: Create and enablevector,postgis,timescaledbextensions for themetadatabase.
Add More Nodes
Add more nodes to the deployment, bring them under Pigsty management, deploy monitoring, configure repos, install software…
demo/node.cast — /demo/node.cast
Deploy HA PostgreSQL Cluster
Now deploy a new database cluster pg-test on the three newly added nodes, using a three-node HA architecture:
demo/pgsql.cast — /demo/pgsql.cast
Deploy Redis Cluster
Pigsty provides optional Redis support as a caching service in front of PostgreSQL:
Redis HA requires cluster mode or sentinel mode. See Redis Configuration.
Deploy Silo Object Storage
Pigsty’s MINIO module currently deploys Silo S3-compatible object storage, which can serve as a PostgreSQL backup repository. The module, inventory group, and playbooks retain the compatible minio name.
Serious production Silo deployments typically require at least 4 nodes with 4 disks each (4N/16D).
Deploy Docker Module
If you want to use containers to run tools for managing PG or software using PostgreSQL, install the DOCKER module:
Use pre-made application templates to launch common software tools with one click, such as the GUI tool for PG management: Pgadmin:
You can even self-host enterprise-grade Supabase with Pigsty, using external HA PostgreSQL clusters as the foundation and running stateless components in containers.
6 - Run Playbooks with Ansible
Pigsty uses Ansible to manage clusters, a very popular large-scale/batch/automation ops tool in the SRE community.
Ansible can use declarative approach for server configuration management. All module deployments are implemented through a series of idempotent Ansible playbooks.
For example, in single-node deployment, you’ll use the deploy.yml playbook. Pigsty has more built-in playbooks, you can choose to use as needed.
Understanding Ansible basics helps with better use of Pigsty, but this is not required, especially for single-node deployment.
Deploy Playbook
Pigsty provides a “one-stop” deploy playbook deploy.yml for the core path: CA/software repository, NODE, INFRA, ETCD, PGSQL, and MINIO when enabled in the inventory. Optional modules such as Redis, Kafka, and native MySQL require their own module playbooks even when defined in the inventory.
| Playbook | Command | Group | infra |
[nodes] |
etcd |
minio |
[pgsql] |
|---|---|---|---|---|---|---|---|
infra.yml |
./infra.yml |
-l infra |
✓ | ✓ | |||
node.yml |
./node.yml |
✓ | ✓ | ✓ | ✓ | ||
etcd.yml |
./etcd.yml |
-l etcd |
✓ | ||||
minio.yml |
./minio.yml |
-l minio |
✓ | ||||
pgsql.yml |
./pgsql.yml |
✓ |
This is the simplest deployment method. You can also follow instructions in Customization Guide to incrementally complete deployment of all modules and nodes step by step.
Install Ansible
When using the Pigsty installation script or the bootstrap phase of offline installation, Pigsty will automatically install ansible and its dependencies for you.
If you want to manually install Ansible, refer to the following instructions. The minimum supported Ansible version is 2.9.
Please note that EL10 EPEL repo doesn’t yet provide a complete Ansible package. Pigsty PGSQL EL10 repo supplements this.
Ansible is also available on macOS. You can use Homebrew to install Ansible on Mac, and use it as an admin node to manage remote cloud servers. This is convenient for single-node Pigsty deployment on cloud VPS, but not recommended in prod envs.
Execute Playbook
Ansible playbooks are executable YAML files containing a series of task definitions to execute.
Running playbooks requires the ansible-playbook executable in your environment variable PATH.
Running ./node.yml playbook is essentially executing the ansible-playbook node.yml command.
You can use some parameters to fine-tune playbook execution. The following 4 parameters are essential for effective Ansible use:
| Purpose | Parameter | Description |
|---|---|---|
| Target | -l|--limit <pattern> |
Limit execution to specific groups/hosts/patterns |
| Tasks | -t|--tags <tags> |
Only run tasks with specific tags |
| Params | -e|--extra-vars <vars> |
Extra command-line parameters |
| Config | -i|--inventory <path> |
Use a specific inventory file |
Limit Hosts
Playbook execution targets can be limited with -l|--limit <selector>.
This is convenient when running playbooks on specific hosts/nodes or groups/clusters.
Here are some host limit examples:
See all details in Ansible documentation: Patterns: targeting hosts and groups
Missing this value can be dangerous—most playbooks execute on all hosts. Use with caution.
Limit Tasks
Execution tasks can be controlled with -t|--tags <tags>.
If specified, only tasks with the given tags will execute instead of the entire playbook.
To run multiple tasks, specify multiple tags separated by commas -t tag1,tag2:
Extra Vars
You can override config parameters at runtime using CLI arguments, which have highest priority.
Extra command-line parameters are passed via -e|--extra-vars KEY=VALUE, usable multiple times:
For complex parameters, use JSON strings to pass multiple complex parameters at once:
Specify Inventory
The default config file is pigsty.yml in the Pigsty home directory.
You can use -i <path> to specify a different inventory file path.
To permanently change the default config file, modify the inventory parameter in ansible.cfg.
Convenience Scripts
Pigsty provides a series of convenience scripts to simplify common operations. These scripts are in the bin/ directory:
These scripts are simple wrappers around Ansible playbooks, making common operations more convenient.
Playbook List
Below are the built-in playbooks in Pigsty. You can also easily add your own playbooks, or customize and modify playbook implementation logic as needed.
| Module | Playbook | Function |
|---|---|---|
| INFRA | deploy.yml |
One-click deploy Pigsty on current node |
| INFRA | infra.yml |
Initialize Pigsty infrastructure on infra nodes |
| INFRA | infra-rm.yml |
Remove infrastructure components from infra nodes |
| INFRA | cache.yml |
Create offline packages from target node |
| INFRA | cert.yml |
Issue certificates using Pigsty self-signed CA |
| NODE | node.yml |
Initialize node, adjust to desired state |
| NODE | node-rm.yml |
Remove node from Pigsty |
| PGSQL | pgsql.yml |
Initialize HA PostgreSQL cluster or add replica |
| PGSQL | pgsql-rm.yml |
Remove PostgreSQL cluster or replica |
| PGSQL | pgsql-db.yml |
Add new business database to existing cluster |
| PGSQL | pgsql-user.yml |
Add new business user to existing cluster |
| PGSQL | pgsql-pitr.yml |
Perform point-in-time recovery on cluster |
| PGSQL | pgsql-monitor.yml |
Monitor remote PostgreSQL with local exporter |
| PGSQL | pgsql-migration.yml |
Generate migration manual and scripts |
| PGSQL | slim.yml |
Install Pigsty with minimal components |
| REDIS | redis.yml |
Initialize Redis cluster/node/instance |
| REDIS | redis-rm.yml |
Remove Redis cluster/node/instance |
| ETCD | etcd.yml |
Initialize ETCD cluster or add new member |
| ETCD | etcd-rm.yml |
Remove ETCD cluster/data or shrink member |
| MINIO | minio.yml |
Initialize a Silo object-storage cluster |
| MINIO | minio-rm.yml |
Remove Silo, its configuration, and optional data |
| DOCKER | docker.yml |
Install Docker on nodes |
| DOCKER | app.yml |
Install applications using Docker Compose |
| JUICE | juice.yml |
Install and configure JuiceFS |
| VIBE | vibe.yml |
Install the Vibe coding environment |
| KAFKA | kafka.yml |
Create or converge a Kafka dynamic KRaft cluster |
| KAFKA | kafka-rm.yml |
Remove a Kafka cluster or member |
| MYSQL (Pilot) | mysql.yml |
Deploy native MySQL 8.4 standalone or three-node clusters |
| MYSQL (Pilot) | mysql-rm.yml |
Stop and retire native MySQL while retaining local state |
7 - Offline Installation
Pigsty installs from Internet upstream by default, but some envs are isolated from the Internet. To address this, Pigsty supports offline installation using offline packages. Think of them as Linux-native Docker images.
Overview
Offline packages bundle all required RPM/DEB packages and dependencies; they are snapshots of the local APT/YUM repo after a normal installation.
In serious prod deployments, we strongly recommend using offline packages. They ensure all future nodes have consistent software versions with the existing env, and avoid online installation failures caused by upstream changes (quite common!), guaranteeing you can run it independently forever.
- Easy delivery in Internet-isolated envs.
- Pre-download all packages in one pass to speed up installation.
- No need to worry about upstream dependency breakage causing install failures.
- If you have multiple nodes, all packages only need to be downloaded once, saving bandwidth.
- Use local repo to ensure all nodes have consistent software versions for unified version management.
- Offline packages are made for specific OS minor versions, typically cannot be used across versions.
- It’s a snapshot at the time of creation, may not include the latest updates and OS security patches.
- Offline packages are typically about 1GB, while online installation downloads on-demand, saving space.
Offline Packages
The following table records the historical v4.4.0 offline artifacts and the OS minor versions used to build them; these are not the currently recommended operating systems.
| Linux Distribution | System Code | Minor Version | Package |
|---|---|---|---|
| RockyLinux 9 x86_64 | el9.x86_64 |
9.7 |
pigsty-pkg-v4.4.0.el9.x86_64.tgz |
| RockyLinux 9 aarch64 | el9.aarch64 |
9.7 |
pigsty-pkg-v4.4.0.el9.aarch64.tgz |
| RockyLinux 10 x86_64 | el10.x86_64 |
10.1 |
pigsty-pkg-v4.4.0.el10.x86_64.tgz |
| RockyLinux 10 aarch64 | el10.aarch64 |
10.1 |
pigsty-pkg-v4.4.0.el10.aarch64.tgz |
| Debian 12 x86_64 | d12.x86_64 |
12.14 |
pigsty-pkg-v4.4.0.d12.x86_64.tgz |
| Debian 12 aarch64 | d12.aarch64 |
12.14 |
pigsty-pkg-v4.4.0.d12.aarch64.tgz |
| Debian 13 x86_64 | d13.x86_64 |
13.6 |
pigsty-pkg-v4.4.0.d13.x86_64.tgz |
| Debian 13 aarch64 | d13.aarch64 |
13.6 |
pigsty-pkg-v4.4.0.d13.aarch64.tgz |
| Ubuntu 26.04 x86_64 | u26.x86_64 |
26.04.0 |
pigsty-pkg-v4.4.0.u26.x86_64.tgz |
| Ubuntu 26.04 aarch64 | u26.aarch64 |
26.04.0 |
pigsty-pkg-v4.4.0.u26.aarch64.tgz |
| Ubuntu 24.04 x86_64 | u24.x86_64 |
24.04.4 |
pigsty-pkg-v4.4.0.u24.x86_64.tgz |
| Ubuntu 24.04 aarch64 | u24.aarch64 |
24.04.4 |
pigsty-pkg-v4.4.0.u24.aarch64.tgz |
| Ubuntu 22.04 x86_64 | u22.x86_64 |
22.04.5 |
pigsty-pkg-v4.4.0.u22.x86_64.tgz |
| Ubuntu 22.04 aarch64 | u22.aarch64 |
22.04.5 |
pigsty-pkg-v4.4.0.u22.aarch64.tgz |
If your OS exactly matches one of these historical artifact baselines, you can use the corresponding v4.4.0 offline package.
The v4.4.0 Community Edition publishes six dual-architecture artifacts for Debian 13, EL 10, and Ubuntu 24.04 on GitHub.
Artifact names and checksums for Debian 12, EL 9, Ubuntu 22.04, and Ubuntu 26.04 remain listed here; those offline packages are available with the Professional Edition.
Download Community Edition artifacts from the GitHub release page. The MD5 checksums for all v4.4.0 offline packages are:
When OS minor versions don’t match, it may work or may fail—we don’t recommend taking the risk.
Please note that the historical v4.4.0 artifacts above were built on EL 9.7/10.1, Debian 12.14/13.6, and Ubuntu 22.04.5/24.04.4/26.04.0.
Cross-minor installation may fail due to OpenSSL/system library differences.
Use online installation on matching OS versions to build your own offline package, or contact us for custom packages.
Using Offline Packages
Offline installation steps:
- Download Pigsty offline package, place it at
/tmp/pkg.tgz - Download Pigsty source package, extract and enter directory (assume extracted to home:
cd ~/pigsty) ./bootstrap, it will extract the package and configure using local repo (and installansiblefrom it offline)./configure -g -c rich, you can directly use therichtemplate configured for offline installation, or configure yourself- Run
./deploy.ymlas usual to install the core path from the local repository; other optional modules still require their own playbooks
demo/install-offline.cast — /demo/install-offline.cast
If you encounter “No package nginx available” errors during offline installation, it usually means a previous installation attempt failed. Delete the /www/pigsty directory and re-run the deployment.
If you want to use the already extracted and configured offline package in your own config, modify and ensure these settings:
repo_enabled: Set totrue, will build local software repo (explicitly disabled in most templates)node_repo_modules: Set tolocal, then all nodes in the env will install from the local software repo- In most templates, this is explicitly set to:
node,infra,pgsql, i.e., install directly from these upstream repos. - Setting it to
localwill use the local software repo to install all packages, fastest, no interference from other repos. - If you want to use both local and upstream repos, you can add other repo module names too, e.g.,
local,node,infra,pgsql
- In most templates, this is explicitly set to:
The first parameter, if enabled, Pigsty will create a local software repo. The second parameter, if contains local, then all nodes in the env will use this local software repo.
If it only contains local, then it becomes the sole repo for all nodes. If you still want to install other packages from other upstream repos, you can add other repo module names too, e.g., local,node,infra,pgsql.
Hybrid Installation Mode
If your environment has Internet access, there’s a hybrid approach that combines the advantages of offline and online installation. You can use the offline package as a base, and supplement missing packages online.
Using the historical v4.4.0 artifacts as an example, suppose you run RockyLinux 9.6 while the package was built for RockyLinux 9.7.
You can use the el9 offline package (though made for 9.7), then execute make repo-build before formal installation to re-download missing packages for 9.6.
Pigsty will download the required increments from upstream repos.
Making Offline Packages
If your OS isn’t in the default list, you can make your own offline package with the built-in cache.yml playbook:
- Find a node running the exact same OS version with Internet access
- Use the
richtemplate for an online installation (./configure -c rich), and confirm that the target INFRA node has generated its local repository at/www/pigsty; if not, run./infra.yml -t repoagainst that node first - Run
cd ~/pigsty; ./cache.yml -l <infra-host>to select one INFRA node that already has a local repository, build the package there, and fetch it - By default, the artifact is
~/pigsty/dist/${version}/pigsty-pkg-${version}.${os}.${arch}.tgz; copy it to the offline environment (ftp, scp, USB, etc.), then unpack it withbootstrap
Current cache.yml defaults can be overridden with extra variables:
cache_pkg_name,- Offline package filename template
cache_pkg_dir,- Output directory on the admin node
cache_repo,- Local repository to package on the target node; separate multiple repositories with commas
We offer paid services providing tested, pre-made offline packages for specific Linux major.minor versions (¥200).
Bootstrap
Pigsty relies on ansible to execute playbooks; this script is responsible for ensuring ansible is correctly installed in various ways.
Usually, you need to run this script in two cases:
- You didn’t install Pigsty via the installation script, but by downloading or
git cloneof the source package, so ansible isn’t installed. - You’re preparing to install Pigsty via offline packages and need to use this script to install ansible from the offline package.
The bootstrap script will automatically detect if the offline package exists (-p to specify, default is /tmp/pkg.tgz).
If it exists, it will extract and use it, then install ansible from it.
If the offline package doesn’t exist, it will try to install ansible from the Internet. If that still fails, you’re on your own!
The bootloader will by default move away existing repo configurations to ensure only required repos are enabled.
You can find them in /etc/yum.repos.d/backup (EL) or /etc/apt/backup (Debian / Ubuntu).
If you want to keep existing repo configurations during bootstrap, use the -k|--keep parameter.
8 - Slim Installation
If you only want HA PostgreSQL database cluster itself without monitoring, infra, etc., consider Slim Installation.
Slim installation has no INFRA module, no monitoring, no local repo—just ETCD and PGSQL and partial NODE functionality.
- Only needing PostgreSQL database itself, no observability infra required.
- Extremely resource-constrained envs unwilling to bear infra overhead (~0.2 vCPU / 500MB on single node).
- Already having external monitoring system, wanting to use your own unified monitoring framework.
- Not needing the Grafana visualization dashboard component.
- No INFRA module, cannot use WebUI and local software repo features.
- Offline Install is limited to single-node mode; multi-node slim install can only be done online.
Overview
To use slim installation, you need to:
- Use the
slim.ymlslim install config template (configure -c slim) - Run the
slim.ymlplaybook instead of the defaultdeploy.yml
demo/install-slim.cast — /demo/install-slim.cast
Description
Slim installation only installs/configures these components:
| Component | Required | Description |
|---|---|---|
patroni |
⚠️ Required | Bootstrap HA PostgreSQL cluster |
etcd |
⚠️ Required | Meta database dependency (DCS) for Patroni |
pgbouncer |
✔️ Optional | PostgreSQL connection pooler |
vip-manager |
✔️ Optional | L2 VIP binding to PostgreSQL cluster primary |
haproxy |
✔️ Optional | Auto-routing services via Patroni health checks |
chronyd |
✔️ Optional | Time synchronization with NTP server |
tuned |
✔️ Optional | Node tuning template and kernel parameter management |
You can disable all optional components via configuration, keeping only the required patroni and etcd.
Because there’s no INFRA module’s Nginx providing local repo service, offline installation only works in single-node mode.
Configuration
Slim installation config file example: conf/slim.yml:
Deployment
Slim installation uses the slim.yml playbook instead of deploy.yml:
HA Cluster
Slim installation can also deploy HA clusters—just add more nodes to the etcd and pg-meta groups. A three-node deployment example:
| ID | NODE | PGSQL | INFRA | ETCD |
|---|---|---|---|---|
| 1 | 10.10.10.10 |
pg-meta-1 |
No INFRA module | etcd-1 |
| 2 | 10.10.10.11 |
pg-meta-2 |
No INFRA module | etcd-2 |
| 3 | 10.10.10.12 |
pg-meta-3 |
No INFRA module | etcd-3 |
9 - Security Recommendations
The default configuration targets local demonstrations and development or testing on a trusted intranet. If other hosts can reach the deployment, complete at least three checks: credentials, network boundaries, and critical files.
Production environments should also review the Security Model, Compliance, and Security Considerations.
Passwords
Pigsty default credentials are public in the source code and documentation and must not be used directly in production.
The configuration wizard can randomize built-in parameters and example credentials that it recognizes:
configure -g does not replace:
- the pgBackRest
cipher_pass; - Silo users and selected example passwords in
ha/safe; - database, object-storage, or application credentials added by the user.
After generation, inspect pigsty.yml and replace every uncovered credential. The wizard prints generated passwords to the terminal, so protect terminal history and automation logs as sensitive data.
See the Default Credentials Checklist for the complete scope.
Firewall
node_firewall_mode defaults to zone. It trusts the intranet defined by node_firewall_intranet and restricts ports exposed to public networks.
| Port | Service | Public by Default |
|---|---|---|
22 |
SSH | Yes |
80 |
Nginx HTTP | Yes |
443 |
Nginx HTTPS | Yes |
5432 |
PostgreSQL | Not in the base default; exposed additionally by the demo pigsty.yml |
Production deployments should normally remove 5432 from the demo configuration. If applications need direct database access, restrict source addresses in the cloud security group, host firewall, and HBA.
Also verify that the intranet definition matches the actual trust boundary. The default RFC 1918 ranges may be too broad; office networks, container networks, and other tenant networks should not become trusted automatically.
Files
The following files and directories contain highly sensitive information:
pigsty.yml: system and application credentials, node definitions, and service configuration;files/pki/ca/ca.key: local CA private key;- the administration user’s SSH private key, used to access managed nodes;
files/pki/misc/*.key: client-certificate private keys;/pg/tmp/pg-user-*.sql: SQL containing plaintext passwords generated during user creation.
Restrict access to the admin node and configuration repository. Do not commit complete inventories or private keys to public repositories. Maintain controlled backups of the CA private key and required configuration.
Related Documentation
- Security and Compliance: security chapter entry point
- Authentication: HBA, passwords, and client certificates
- Encrypted Communication: CA, TLS, and server verification
- Production Security Considerations: complete launch checklist