This is the multi-page printable view of this section. .
Deployment
- 1: Install Pigsty for Production
- 2: Prepare Resources for Serious Deployment
- 3: Planning Architecture and Nodes
- 4: Setup Admin User and Privileges
- 5: Sandbox
- 6: Vagrant
- 7: OpenTofu
- 8: Security Considerations
Unlike Getting Started, production Pigsty deployments require more Architecture Planning and Preparation.
This chapter helps you understand the complete deployment process and provides best practices for production environments.
Before deploying to production, we recommend testing in Pigsty’s Sandbox to fully understand the workflow. Use Vagrant to create a local 4-node sandbox, or leverage OpenTofu to provision larger simulation environments in the cloud.
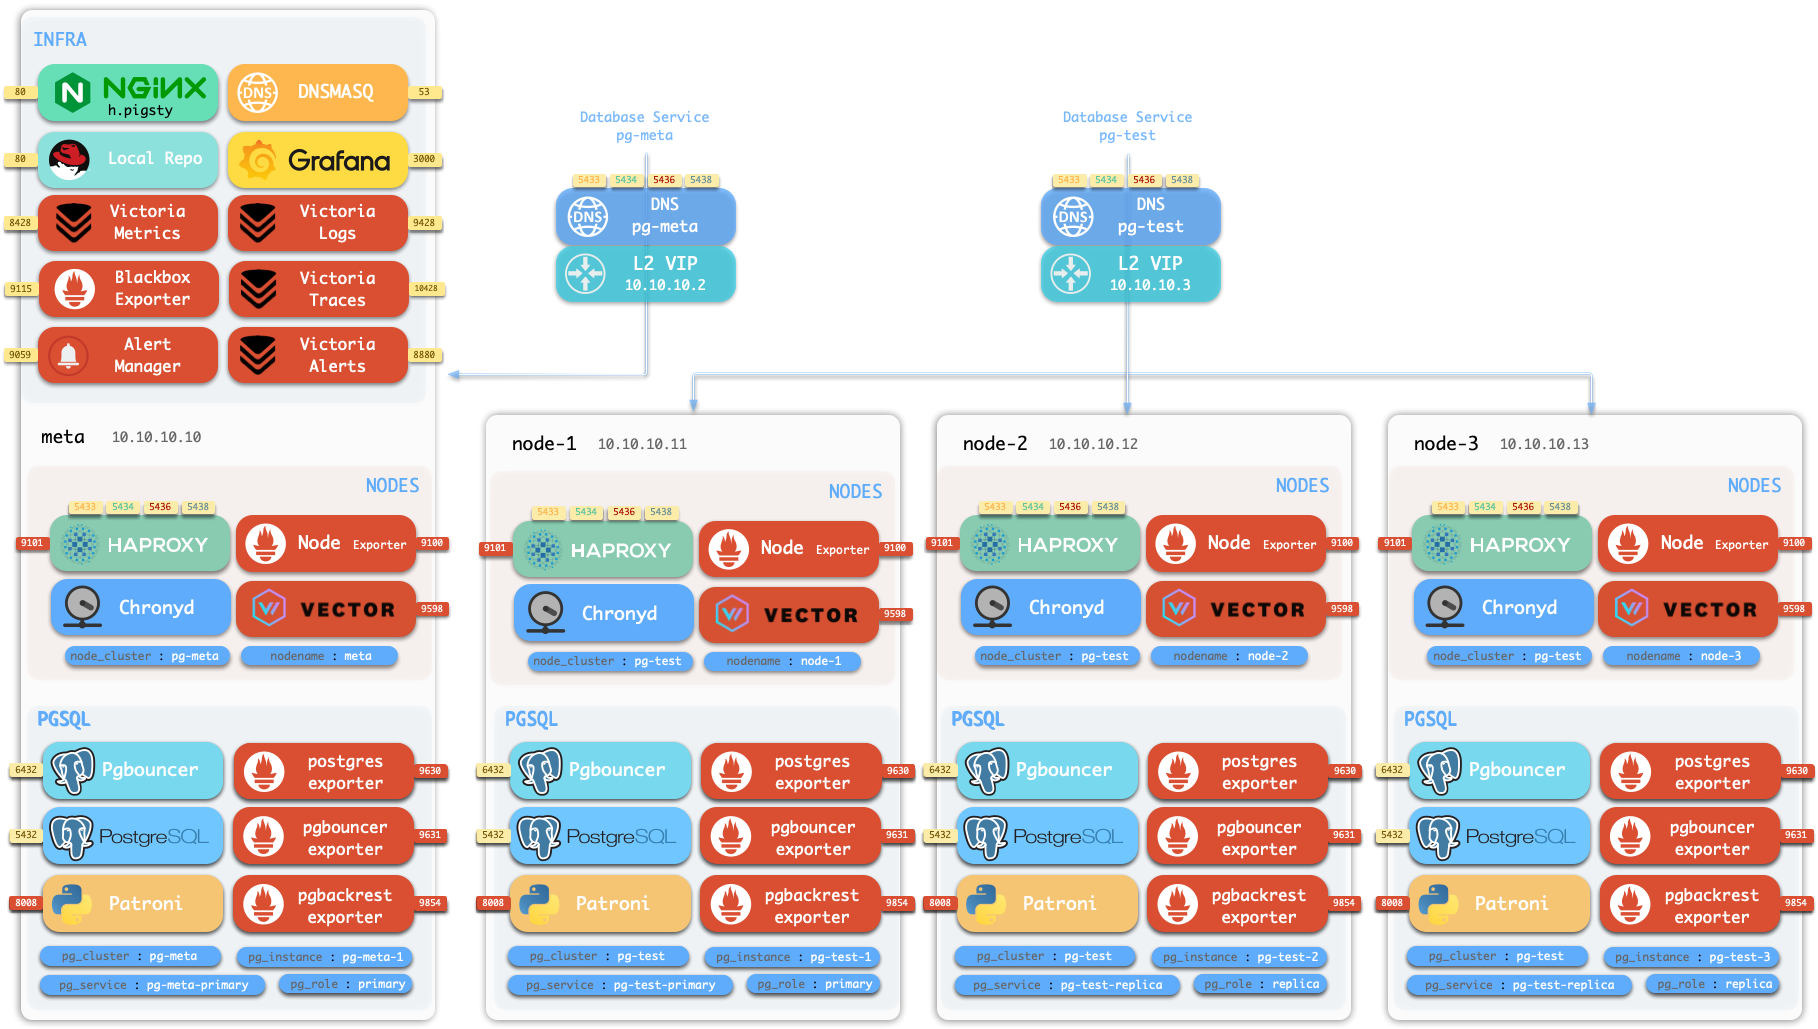
For production, you typically need at least three nodes for high availability. You should understand Pigsty’s core Concepts and common administration procedures, including Configuration, Ansible Playbooks, and Security Hardening for enterprise compliance.
1 - Install Pigsty for Production
This is the Pigsty production multi-node deployment guide. For single-node Demo/Dev setups, see Getting Started.
Summary
Prepare nodes with SSH access following your architecture plan,
install a compatible Linux OS, then execute with an admin user having passwordless ssh and sudo:
This runs the install script, downloading and extracting Pigsty source to your home directory with dependencies installed. Complete configuration and deployment to finish.
Before running deploy.yml for deployment, review and edit the configuration inventory: pigsty.yml.
After installation, access the WebUI via IP/domain + ports 80/443,
and PostgreSQL service via port 5432.
Full installation takes 3-10 minutes depending on specs/network. Offline installation significantly speeds this up; slim installation further accelerates when monitoring isn’t needed.
Video Example: 20-node Production Simulation (Ubuntu 24.04 x86_64)
demo/install-simu.cast — /demo/install-simu.cast
Prepare
Production Pigsty deployment involves preparation work. Here’s the complete checklist:
| Item | Requirement | Item | Requirement |
|---|---|---|---|
| Node | At least 1C2G, no upper limit |
Plan | Multiple homogeneous nodes: 2/3/4 or more |
| Disk | /data as default mount point |
FS | xfs recommended; ext4/zfs as needed |
| VIP | L2 VIP, optional (unavailable in cloud) | Network | Static IPv4, single-node can use 127.0.0.1 |
| CA | Self-signed CA or specify existing certs | Domain | Local/public domain, optional, default i.pigsty |
| Kernel | Linux x86_64 / aarch64 |
Linux | el8, el9, el10, d12, d13, u22, u24, u26 |
| Locale | C.UTF-8 or C |
Firewall | Ports: 80/443/22/5432 (optional) |
| User | Avoid root and postgres |
Sudo | sudo privilege, preferably with nopass |
| SSH | Passwordless SSH via public key | Accessible | ssh <ip|alias> sudo ls no error |
Install
Use the following to automatically install the Pigsty source package to ~/pigsty (recommended). Deployment dependencies (Ansible) are auto-installed.
If you prefer not to run remote scripts, manually download or clone the source. When using git, always checkout a specific version before use:
For manual download/clone, additionally run bootstrap to manually install Ansible and other dependencies, or install them yourself:
Configure
In Pigsty, deployment details are defined by the configuration inventory—the pigsty.yml config file. Customize through declarative configuration.
Pigsty provides configure as an optional configuration wizard,
generating a configuration inventory with good defaults based on your environment:
The generated config defaults to ~/pigsty/pigsty.yml. Review and customize before installation.
Many configuration templates are available for reference. You can skip the wizard and directly edit pigsty.yml:
The wizard only replaces the current node’s IP (use -s to skip replacement). For multi-node deployments, replace other node IPs manually.
Also customize the config as needed—modify default passwords, add nodes, etc.
Common configure parameters:
| Parameter | Description |
|---|---|
-c|--conf |
Specify config template relative to conf/, without .yml suffix |
-v|--version |
PostgreSQL major version 14 through 19; PG19 is currently Beta |
-r|--region |
Upstream repo region for faster downloads: default|china|europe |
-n|--non-interactive |
Use CLI params for primary IP, skip interactive wizard |
-x|--proxy |
Configure proxy_env from current environment variables |
If your machine has multiple IPs, explicitly specify one with -i|--ip <ipaddr> or provide it interactively.
The script replaces IP placeholder 10.10.10.10 with the current node’s primary IPv4. Use a static IP; never use public IPs.
Generated config is at ~/pigsty/pigsty.yml. Review and modify before installation.
Change default passwords and credentials before installation. See Security Recommendations.
Deploy
Pigsty’s deploy.yml playbook applies the configuration blueprint to all target nodes.
When output ends with pgsql init done, PLAY RECAP, etc., installation is complete!
Upstream repos (Linux/PGDG) may break due to improper updates, causing deployment failures (quite common)! For serious production deployments, we strongly recommend using verified offline packages for offline installation.
Warning: Running deploy.yml again on an initialized environment may restart services and overwrite configs. Be careful!
Interface
Assuming the 4-node deployment template, your Pigsty environment should have a structure like:
| ID | NODE | PGSQL | INFRA | ETCD |
|---|---|---|---|---|
| 1 | 10.10.10.10 |
pg-meta-1 |
infra-1 |
etcd-1 |
| 2 | 10.10.10.11 |
pg-test-1 |
- | - |
| 3 | 10.10.10.12 |
pg-test-2 |
- | - |
| 4 | 10.10.10.13 |
pg-test-3 |
- | - |
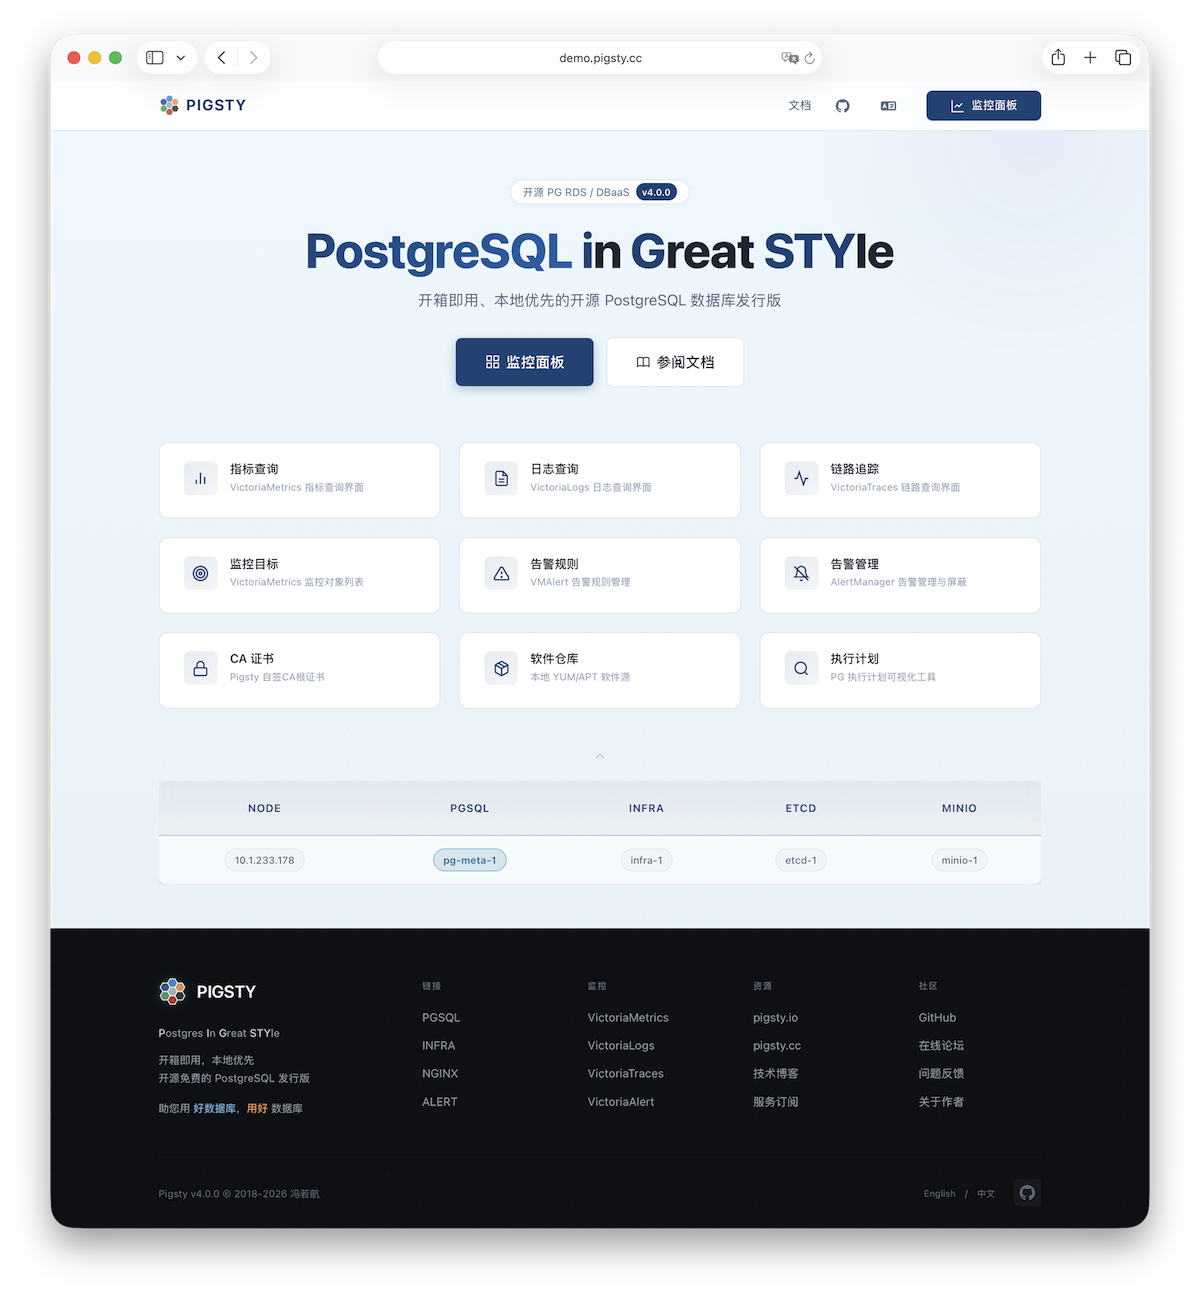
The INFRA module provides a graphical management interface via browser, accessible through Nginx’s 80/443 ports.
The PGSQL module provides a PostgreSQL database server on port 5432, also accessible via Pgbouncer/HAProxy proxies.
For production multi-node HA PostgreSQL clusters, use service access for automatic traffic routing.
More
After installation, explore the WebUI and access PostgreSQL service via port 5432.
Deploy and monitor more clusters—add definitions to the configuration inventory and run:
Most modules require the NODE module first. See available modules:
2 - Prepare Resources for Serious Deployment
Pigsty runs on nodes (physical machines or VMs). This document covers the planning and preparation required for deployment.
Node
Pigsty currently runs on Linux kernel with x86_64 / aarch64 architecture.
A “node” refers to an SSH accessible resource that provides a bare Linux OS environment.
It can be a physical machine, virtual machine, or a systemd-enabled container equipped with systemd, sudo, and sshd.
Deploying Pigsty requires at least 1 node. You can prepare more and deploy everything in one pass via playbooks, or add nodes later.
The minimum spec requirement is 1C1G, but at least 1C2G is recommended. Higher is better—no upper limit. Parameters are auto-tuned based on available resources.
The number of nodes you need depends on your requirements. See Architecture Planning for details. Although a single-node deployment with external backup provides reasonable recovery guarantees, we recommend multiple nodes for production. A functioning HA setup requires at least 3 nodes; 2 nodes provide Semi-HA.
Disk
Pigsty uses /data as the default data directory. If you have a dedicated data disk, mount it there.
Use /data1, /data2, /dataN for additional disk drives.
To use a different data directory, configure these parameters:
| Name | Description | Default |
|---|---|---|
node_data |
Node main data directory | /data |
pg_fs_main |
PG main data directory | /data/postgres |
pg_fs_backup |
PG backup directory | /data/backups |
etcd_data |
ETCD data directory | /data/etcd |
infra_data |
Infra data directory | /data/infra |
nginx_data |
Nginx data directory | /data/nginx |
minio_data |
Silo data directory | /data/minio |
redis_fs_main |
Redis data directory | /data/redis |
kafka_data |
Kafka data directory | /data/kafka |
The native MySQL 8.4 pilot module does not currently expose a data-directory parameter and always uses /var/lib/mysql.
Filesystem
You can use any supported Linux filesystem for data disks. For production, we recommend xfs.
xfs is a Linux standard with excellent performance and CoW capabilities for instant large database cluster cloning. Multi-drive Silo deployments require xfs.
ext4 is another viable option with a richer data recovery tool ecosystem, but lacks CoW.
zfs provides RAID and snapshot features but with significant performance overhead and requires separate installation.
Choose among these three based on your needs. Avoid NFS for database services.
Pigsty assumes /data is owned by root:root with 755 permissions.
Admins can assign ownership for first-level directories; each application runs with a dedicated user in its subdirectory.
See FHS for the directory structure reference.
Network
Pigsty defaults to online installation mode, requiring outbound Internet access. Offline installation eliminates the Internet requirement.
Internally, Pigsty requires a static network. Assign a fixed IPv4 address to each node.
The IP address serves as the node’s unique identifier—the primary IP bound to the main network interface for internal communications.
For single-node deployment without a fixed IP, use the loopback address 127.0.0.1 as a workaround.
Using public IP addresses as node identifiers can cause security and connectivity issues. Always use internal IP addresses.
VIP
Pigsty supports optional L2 VIP for NODE clusters (keepalived) and PGSQL clusters (vip-manager).
To use L2 VIP, you must explicitly assign an L2 VIP address for each node/database cluster. This is straightforward on your own hardware but may be challenging in public cloud environments.
To use optional Node VIP and PG VIP features, ensure all nodes are on the same L2 network.
CA
Pigsty generates a self-signed CA infrastructure for each deployment, issuing all encryption certificates.
If you have an existing enterprise CA or self-signed CA, you can use it to issue the certificates Pigsty requires.
Domain
Pigsty uses a local static domain i.pigsty by default for WebUI access. This is optional—IP addresses work too.
For production, domain names are recommended to enable HTTPS and encrypted data transmission. Domains also allow multiple services on the same port, differentiated by domain name.
For Internet-facing deployments, use public DNS providers (Cloudflare, AWS Route53, etc.) to manage resolution. Point your domain to the Pigsty node’s public IP address. For LAN/office network deployments, use internal DNS servers with the node’s internal IP address.
For local-only access, add the following to /etc/hosts on machines accessing the Pigsty WebUI:
Linux
Pigsty runs on Linux. It currently targets 16 platform combinations: eight distribution major versions across two architectures. See the Compatible OS List.
We recommend Rocky Linux 9.8 / 10.2, Debian 12.15 / 13.6, or Ubuntu 22.04.5 / 24.04.4 / 26.04.0 as default options.
On macOS and Windows, use VM software or Docker systemd images to run Pigsty.
We strongly recommend a fresh OS installation. If your server already runs Nginx, PostgreSQL, or similar services, consider deploying on new nodes.
For multi-node deployments, ensure all nodes use the same Linux distribution, architecture, and version. Heterogeneous deployments may work but are unsupported and may cause unpredictable issues.
Locale
We recommend setting en_US as the primary OS language, or at minimum ensuring this locale is available, so PostgreSQL logs are in English.
Some distributions (e.g., Debian) may not provide the en_US locale by default. Enable it with:
For PostgreSQL, we strongly recommend using the built-in C.UTF-8 collation (PG 17+) as the default.
The configuration wizard automatically sets C.UTF-8 as the collation when PG version and OS support are detected.
Ansible
Pigsty uses Ansible to control all managed nodes from the admin node. See Installing Ansible for details.
Pigsty installs Ansible on Infra nodes by default, making them usable as admin nodes (or backup admin nodes). For single-node deployment, the installation node serves as both the admin node running Ansible and the INFRA node hosting infrastructure.
Pigsty
You can install the current default Pigsty source with:
To install a specific version, use the -s <version> parameter:
To install the latest beta version:
For developers or the latest development version, clone the repository directly:
If your environment lacks Internet access, download the source tarball from GitHub Releases or the Pigsty repository:
3 - Planning Architecture and Nodes
Pigsty uses a modular architecture. You can combine modules like building blocks and express your intent through declarative configuration.
Common Patterns
Here are common deployment patterns for reference. Customize based on your requirements:
| Pattern | INFRA | ETCD | PGSQL | MINIO | Description |
|---|---|---|---|---|---|
Single-node (meta) |
1 | 1 | 1 | Single-node deployment default | |
Slim deploy (slim) |
1 | 1 | Database only, no monitoring infra | ||
Infra-only (infra) |
1 | Monitoring infrastructure only | |||
Rich deploy (rich) |
1 | 1 | 1 | 1 | Single-node + object storage + local repo with all extensions |
| Multi-node Pattern | INFRA | ETCD | PGSQL | MINIO | Description |
|---|---|---|---|---|---|
Two-node (dual) |
1 | 1 | 2 | Semi-HA, tolerates specific node failure | |
Three-node (trio) |
3 | 3 | 3 | Standard HA, tolerates any one failure | |
Four-node (full) |
1 | 1 | 1+3 | Demo setup, single INFRA/ETCD | |
Production (simu) |
2 | 3 | n | n | 2 INFRA, 3 ETCD |
| Large-scale (custom) | 3 | 5 | n | n | 3 INFRA, 5 ETCD |
Your architecture choice depends on reliability requirements and available resources. Serious production deployments require at least 3 nodes for HA configuration. With only 2 nodes, use Semi-HA configuration.
We offer Architecture Consulting Services to help plan your Pigsty configuration.
Trade-offs
- Pigsty monitoring requires at least 1 INFRA node. Production typically uses 2; large-scale deployments use 3.
- PostgreSQL HA requires at least 1 ETCD node. Production typically uses 3; large-scale uses 5. Even-member clusters work, but do not tolerate more failures than an odd cluster with one fewer member, so prefer odd sizes.
- Silo object storage through the MINIO module requires at least 1 MINIO node. Production typically uses 4+ nodes in MNMD clusters.
- Production PG clusters typically use at least two-node primary-replica configuration; serious deployments use 3 nodes; high read loads can have dozens of replicas.
- For PostgreSQL, you can also use advanced configurations: offline instances, sync instances, standby clusters, delayed clusters, etc.
Single-Node Setup
The simplest configuration with everything on a single node. Installs four essential modules by default. Typically used for demos, devbox, or testing.
With an external S3/MinIO backup repository providing RTO/RPO guarantees, this configuration works for standard production environments.
Single-node variants:
- Rich (
rich): Production single-node template with local Silo object storage, local software repo, and all PG extensions. - Slim (
slim): Installs only PGSQL and ETCD, no monitoring infra. Slim installation can expand to multi-node HA deployment. - Infra-only (
infra): Opposite of slim—installs only INFRA monitoring infrastructure, no database services, for monitoring other instances. - Alternative kernels: Replace vanilla PG with derivatives:
pgsql,mssql,polar,ivory,mysql,pgtde,oriole,agens,pgedge.
Two-Node Setup
Two-node configuration enables database replication and Semi-HA capability with better data redundancy and limited failover support:
Two-node HA auto-failover has limitations. This “Semi-HA” setup only auto-recovers from specific node failures:
- If
node-1fails: No automatic failover—requires manual promotion ofnode-2 - If
node-2fails: Automatic failover works—node-1auto-promoted
Three-Node Setup
Three-node template provides true baseline HA configuration, tolerating any single node failure with automatic recovery.
| ID | NODE | PGSQL | INFRA | ETCD |
|---|---|---|---|---|
| 1 | node-1 |
pg-meta-1 |
infra-1 |
etcd-1 |
| 2 | node-2 |
pg-meta-2 |
infra-2 |
etcd-2 |
| 3 | node-3 |
pg-meta-3 |
infra-3 |
etcd-3 |
Four-Node Setup
Pigsty Sandbox uses the standard four-node configuration.
| ID | NODE | PGSQL | INFRA | ETCD |
|---|---|---|---|---|
| 1 | node-1 |
pg-meta-1 |
infra-1 |
etcd-1 |
| 2 | node-2 |
pg-test-1 |
||
| 3 | node-3 |
pg-test-2 |
||
| 4 | node-4 |
pg-test-3 |
For demo purposes, INFRA / ETCD modules aren’t configured for HA. You can adjust further:
| ID | NODE | PGSQL | INFRA | ETCD | MINIO |
|---|---|---|---|---|---|
| 1 | node-1 |
pg-meta-1 |
infra-1 |
etcd-1 |
minio-1 |
| 2 | node-2 |
pg-test-1 |
infra-2 |
etcd-2 |
|
| 3 | node-3 |
pg-test-2 |
etcd-3 |
||
| 4 | node-4 |
pg-test-3 |
More Nodes
With proper virtualization infrastructure or abundant resources, you can use more nodes for dedicated deployment of each module, achieving optimal reliability, observability, and performance.
| ID | NODE | INFRA | ETCD | MINIO | PGSQL |
|---|---|---|---|---|---|
| 1 | 10.10.10.10 |
infra-1 |
pg-meta-1 |
||
| 2 | 10.10.10.11 |
infra-2 |
pg-meta-2 |
||
| 3 | 10.10.10.21 |
etcd-1 |
|||
| 4 | 10.10.10.22 |
etcd-2 |
|||
| 5 | 10.10.10.23 |
etcd-3 |
|||
| 6 | 10.10.10.31 |
minio-1 |
|||
| 7 | 10.10.10.32 |
minio-2 |
|||
| 8 | 10.10.10.33 |
minio-3 |
|||
| 9 | 10.10.10.34 |
minio-4 |
|||
| 10 | 10.10.10.40 |
pg-src-1 |
|||
| 11 | 10.10.10.41 |
pg-src-2 |
|||
| 12 | 10.10.10.42 |
pg-src-3 |
|||
| 13 | 10.10.10.50 |
pg-test-1 |
|||
| 14 | 10.10.10.51 |
pg-test-2 |
|||
| 15 | 10.10.10.52 |
pg-test-3 |
|||
| 16 | …… |
4 - Setup Admin User and Privileges
Pigsty requires an OS admin user with passwordless SSH and Sudo privileges on all managed nodes.
This user must be able to SSH to all managed nodes and execute sudo commands on them.
User
Typically use names like dba or admin, avoiding root and postgres:
- Using
rootfor deployment is possible but not a production best practice. - Using
postgres(pg_dbsu) as admin user is strictly prohibited.
Passwordless
The passwordless requirement is optional if you can accept entering a password for every ssh and sudo command.
Use -k|--ask-pass when running playbooks to prompt for SSH password,
and -K|--ask-become-pass to prompt for sudo password.
Some enterprise security policies may prohibit passwordless ssh or sudo. In such cases, use the options above,
or consider configuring a sudoers rule with a longer password cache time to reduce password prompts.
Create Admin User
Typically, your server/VM provider creates an initial admin user.
If unsatisfied with that user, Pigsty’s deployment playbook can create a new admin user for you.
Assuming you have root access or an existing admin user on the node, create an admin user with Pigsty itself:
This leverages the existing admin to create a new one—a dedicated dba (uid=88) user described by these parameters, with sudo/ssh properly configured:
| Name | Description | Default |
|---|---|---|
node_admin_enabled |
Enable node admin user | true |
node_admin_uid |
Node admin user UID | 88 |
node_admin_username |
Node admin username | dba |
Sudo
All admin users should have sudo privileges on all managed nodes, preferably with passwordless execution.
To configure an admin user with passwordless sudo from scratch, edit/create a sudoers file (assuming username vagrant):
For admin user dba, the /etc/sudoers.d/dba content should be:
If your security policy prohibits passwordless sudo, remove the NOPASSWD: part:
Ansible relies on sudo to execute commands with root privileges on managed nodes.
In environments where sudo is unavailable (e.g., inside Docker containers), install sudo first.
SSH
Your current user should have passwordless SSH access to all managed nodes as the corresponding admin user.
Your current user can be the admin user itself, but this isn’t required—as long as you can SSH as the admin user.
SSH configuration is Linux 101, but here are the basics:
Generate SSH Key
If you don’t have an SSH key pair, generate one:
Pigsty will do this for you during the bootstrap stage if you lack a key pair.
Copy SSH Key
Distribute your generated public key to remote (and local) servers, placing it in the admin user’s ~/.ssh/authorized_keys file on all nodes.
Use the ssh-copy-id utility:
Using Alias
When direct SSH access is unavailable (jumpserver, non-standard port, different credentials), configure SSH aliases in ~/.ssh/config:
Reference the alias in the inventory using ansible_host for the real SSH alias:
SSH parameters work directly in Ansible. See Ansible Inventory Guide for details. This technique enables accessing nodes in private networks via jumpservers, or using different ports and credentials, or using your local laptop as an admin node.
Check Accessibility
You should be able to passwordlessly ssh from the admin node to all managed nodes as your current user.
The remote user (admin user) should have privileges to run passwordless sudo commands.
To verify passwordless ssh/sudo works, run this command on the admin node for all managed nodes:
If there’s no password prompt or error, passwordless ssh/sudo is working as expected.
Firewall
Production deployments typically require firewall configuration to block unauthorized port access.
By default, block inbound access from office/Internet networks except:
- SSH port
22for node access - HTTP (
80) / HTTPS (443) for WebUI services - PostgreSQL port
5432for database access
If accessing PostgreSQL via other ports, allow them accordingly. See used ports for the complete port list.
5432: PostgreSQL database6432: Pgbouncer connection pooler5433: PG primary service5434: PG replica service5436: PG default service5438: PG offline service
5 - Sandbox
Pigsty provides a standard 4-node sandbox environment for learning, testing, and feature demonstration.
The sandbox uses fixed IP addresses and predefined identity identifiers, making it easy to reproduce various demo use cases.
Description
The default sandbox environment consists of 4 nodes, using the ha/full.yml configuration template.
| ID | IP Address | Node | PostgreSQL | INFRA | ETCD | MINIO |
|---|---|---|---|---|---|---|
| 1 | 10.10.10.10 |
meta |
pg-meta-1 |
infra-1 |
etcd-1 |
minio-1 |
| 2 | 10.10.10.11 |
node-1 |
pg-test-1 |
|||
| 3 | 10.10.10.12 |
node-2 |
pg-test-2 |
|||
| 4 | 10.10.10.13 |
node-3 |
pg-test-3 |
The sandbox configuration can be summarized as the following config:
PostgreSQL Clusters
The sandbox comes with a single-instance PostgreSQL cluster pg-meta on the meta node:
There’s also a 3-instance PostgreSQL HA cluster pg-test deployed on the other three nodes:
Two optional L2 VIPs are bound to the primary instances of pg-meta and pg-test clusters respectively.
Infrastructure
The meta node also hosts:
- ETCD cluster: Single-node
etcdcluster providing DCS service for PostgreSQL HA - Silo cluster: A single-node
miniocluster managed by the MINIO module, providing S3-compatible object storage
ha/full.yml also declares three Redis example topologies and enables Docker installation on the INFRA node. The standard deploy.yml does not deploy these two optional modules; run ./redis.yml and ./docker.yml separately when needed.
Creating Sandbox
Pigsty provides out-of-the-box templates. You can use Vagrant to create a local sandbox, or use OpenTofu to create a cloud sandbox.
Local Sandbox (Vagrant)
Local sandbox uses VirtualBox/libvirt to create local virtual machines, running free on your Mac / PC.
To run the full 4-node sandbox, your machine should have at least 4 CPU cores and 8GB memory.
The current Vagrant configuration uses the cloud-image/* boxes from Vagrant Cloud. See Vagrant: Supported Images for available images, source-pinned versions, and architecture details. Boxes without a version pinned in source are resolved by Vagrant to their currently available version.
Cloud Sandbox (Terraform)
Cloud sandbox uses public cloud API to create virtual machines. Easy to create and destroy, pay-as-you-go, ideal for quick testing.
Use the spec/aliyun-full.tf template to create a 4-node sandbox on Alibaba Cloud:
For more details, please refer to the OpenTofu documentation.
Other Specs
Besides the standard 4-node sandbox, Pigsty also provides other environment specs:
Run the following Makefile shortcuts from ~/pigsty/vagrant:
Single Node Devbox (meta)
The simplest 1-node environment for quick start, development, and testing:
Two Node Environment (dual)
2-node environment for testing primary-replica replication:
Three Node Environment (trio)
3-node environment for testing basic high availability:
Production Simulation (simu)
20-node large simulation environment for full production environment testing:
This environment includes:
- 3 infrastructure nodes (
meta1,meta2,meta3) - 2 HAProxy proxy nodes
- 4 MINIO (Silo) nodes
- 5 ETCD nodes
- 6 PostgreSQL nodes (2 clusters, 3 nodes each)
6 - Vagrant
Vagrant is a popular local virtualization tool that creates local virtual machines in a declarative manner.
Pigsty requires a Linux environment to run. You can use Vagrant to easily create Linux virtual machines locally for testing.
The currently recommended and validated baselines are Rocky Linux 9.8 / 10.2, Debian 12.15 / 13.6, and Ubuntu 22.04.5 / 24.04.4 / 26.04.0. Major-version Vagrant aliases map to pinned box versions.
Quick Start
Install Dependencies
First, ensure you have Vagrant and a virtual machine provider (such as VirtualBox or libvirt) installed on your system.
On macOS, you can use Homebrew for one-click installation:
After installing VirtualBox, you need to restart your system and allow its kernel extensions in System Preferences.
On Linux, you can use VirtualBox or vagrant-libvirt as the VM provider.
Create Virtual Machines
Use the Pigsty-provided make shortcuts to create virtual machines:
You can use variant aliases to specify different operating system images:
Available OS suffixes: 8 (EL8), 9 (EL9), 10 (EL10), 12 (Debian 12.15), 13 (Debian 13.6), 22 (Ubuntu 22.04.5), 24 (Ubuntu 24.04.4), 26 (Ubuntu 26.04.0)
Build Environment
You can also use the following aliases to create Pigsty build environments. These templates won’t replace the base image:
Spec Templates
Pigsty provides multiple predefined VM specs in the vagrant/spec/ directory:
| Template | Nodes | Spec | Description | Alias |
|---|---|---|---|---|
| meta.rb | 1 node | 2c4g x 1 | Single-node devbox | Devbox |
| dual.rb | 2 nodes | 1c2g x 2 | Two-node environment | |
| trio.rb | 3 nodes | 1c2g x 3 | Three-node environment | |
| full.rb | 4 nodes | 2c4g + 1c2g x 3 | 4-node full sandbox | Sandbox |
| deci.rb | 10 nodes | Mixed | 10-node environment | |
| simu.rb | 20 nodes | Mixed | 20-node production simubox | Simubox |
| minio.rb | 4 nodes | 1c2g x 4 + disk | MinIO test environment | |
| citus.rb | 13 nodes | Mixed | Citus coordinator and six two-replica worker groups | |
| oss.rb | 7 nodes | 2c2g x 7 | 7-platform OSS build environment | |
| pro.rb | 7 nodes | 2c2g x 7 | 7-platform PRO build environment | |
| rpm.rb | 2 nodes | 1c2g x 2 | 2-node EL build environment | |
| deb.rb | 5 nodes | 1c2g x 5 | 5-node Deb build environment | |
| all.rb | 7 nodes | 1c2g x 7 | 7-node full build environment |
Each spec file contains a Specs variable describing the VM nodes. For example, full.rb contains the 4-node sandbox definition:
Current Vagrant templates explicitly provision a 32 GB primary system disk for every VM. Regular nodes also receive one data disk whose size comes from the spec’s disk value, defaulting to 128 GB when omitted. Object-storage nodes whose names begin with minio instead receive four 32 GB data disks mounted at /data1 through /data4.
These disks depend on Vagrant’s experimental disks feature. The repository Makefile exports VAGRANT_EXPERIMENTAL=disks automatically; set it yourself when invoking vagrant directly.
simu Spec Details
simu.rb provides a 20-node production environment simulation configuration:
- 3 x infra nodes (
meta1-3): 4c16g - 2 x haproxy nodes (
proxy1-2): 1c2g - 4 x minio nodes (
minio1-4): 1c2g - 5 x etcd nodes (
etcd1-5): 1c2g - 6 x pgsql nodes (
pg-src-1-3,pg-dst-1-3): 2c4g
Config Script
Use the vagrant/config script to generate the final Vagrantfile based on spec and options:
Image Aliases
The config script supports various image aliases:
| Distro | Alias | Vagrant Box |
|---|---|---|
| Rocky 8 | el8, rocky8, r8 |
cloud-image/rocky-8 |
| Rocky 9 | el9, rocky9, el, r9 |
cloud-image/rocky-9 |
| Rocky 10 | el10, rocky10, r10 |
cloud-image/rocky-10 |
| Debian 12 | d12, debian12, deb12 |
cloud-image/debian-12 |
| Debian 13 | d13, debian13, deb13 |
cloud-image/debian-13 |
| Ubuntu 22.04.5 | u22, ubuntu22, ubuntu2204 |
cloud-image/ubuntu-22.04 |
| Ubuntu 24.04.4 | u24, ubuntu24, ubuntu2404, ubuntu |
cloud-image/ubuntu-24.04 |
| Ubuntu 26.04.0 | u26, ubuntu26, ubuntu2604 |
cloud-image/ubuntu-26.04 |
| AlmaLinux 8 | alma8 |
cloud-image/almalinux-8 |
| AlmaLinux 9 | alma9 |
cloud-image/almalinux-9 |
| AlmaLinux 10 | alma10 |
cloud-image/almalinux-10 |
| RHEL 8 / 9 | rhel8, rhel9 |
generic/rhel8, generic/rhel9 |
| Oracle Linux 8 / 9 | oracle8, oracle9 |
generic/oracle8, generic/oracle9 |
The historical d11/debian11/deb11 and u20/ubuntu20/ubuntu2004 aliases remain visible in the script mapping, but the current script explicitly rejects them; they are not supported images.
Resource Scaling
You can use the VM_SCALE environment variable to adjust the resource multiplier (default is 1):
For example, using VM_SCALE=4 with the meta spec will adjust the default 2c4g to 8c16g:
The simu and deci specs don’t support resource scaling. The scale parameter is automatically reset to 1 because their resource configurations are already optimized for simulation scenarios.
VM Management
The vagrant/Makefile provides shortcuts for managing virtual machines. Run the following commands from that directory:
SSH Keys
Pigsty Vagrant templates use your ~/.ssh/id_rsa[.pub] as the SSH key for VMs by default.
Before starting, ensure you have a valid SSH key pair. If not, generate one with:
Supported Images
The standard EL, Debian, Ubuntu, and AlmaLinux matrix uses cloud-image/* boxes from Vagrant Cloud. Explicit RHEL and Oracle Linux aliases use generic/* boxes. The current config script applies the same cloud-image/* mapping to VirtualBox, libvirt, amd64, and arm64; actual payload availability is still resolved by Vagrant Cloud at runtime.
VirtualBox and libvirt use the same mapping. vagrant/config writes the validated versions below for every supported cloud-image/* image, making amd64 and arm64 environments reproducible:
| OS | Vagrant Box | Source Version Policy |
|---|---|---|
| Rocky 8 | cloud-image/rocky-8 |
8.10.20240528.0 |
| Rocky 9 | cloud-image/rocky-9 |
9.8.20260525.0 |
| Rocky 10 | cloud-image/rocky-10 |
10.2.20260525.0 |
| Debian 12 | cloud-image/debian-12 |
20260806.2562.0 |
| Debian 13 | cloud-image/debian-13 |
20260810.2566.0 |
| Ubuntu 22.04 | cloud-image/ubuntu-22.04 |
20260810.0.0 |
| Ubuntu 24.04 | cloud-image/ubuntu-24.04 |
20260801.0.0 |
| Ubuntu 26.04 | cloud-image/ubuntu-26.04 |
20260731.0.0 |
| AlmaLinux 8 | cloud-image/almalinux-8 |
8.10.20260803 |
| AlmaLinux 9 | cloud-image/almalinux-9 |
9.8.20260810 |
| AlmaLinux 10 | cloud-image/almalinux-10 |
10.2.20260526.0 |
The retained but unsupported Debian 11 and Ubuntu 20.04 aliases are pinned to 20260618.2513.0 and 20250624.0.0; experimental generic/* RHEL, Oracle Linux, and CentOS 7 images are pinned to their final 4.3.12 release. These legacy images are outside the current support matrix.
Environment Variables
You can use the following environment variables to control Vagrant behavior:
Notes
When using older versions of VirtualBox as Vagrant provider, additional configuration is required to use 10.x.x.x CIDR as Host-Only network:
The first time you use Vagrant to start a specific operating system, it will download the corresponding Box image file (typically 1-2 GB). After download, the image is cached and reused for subsequent VM creation.
If you’re using libvirt as the provider, you can use make info to view VMs, networks, and storage volume information, and make nuke to forcefully destroy all related resources.
7 - OpenTofu
OpenTofu is an open-source “Infrastructure as Code” tool that you can use to create virtual machines on public clouds with one click.
Pigsty uses OpenTofu by default and provides Terraform-compatible .tf templates for Alibaba Cloud, AWS (global and China), Azure, GCP, Tencent Cloud, Hetzner, Vultr, DigitalOcean, and Linode. The aliyun-s3.tf template also creates a private OSS bucket and dedicated RAM read/write credentials for S3/pgBackRest scenarios.
Quick Start
Install OpenTofu
On macOS, you can use Homebrew to install OpenTofu:
For Debian, Ubuntu, RHEL, and other platforms, refer to the OpenTofu installation guide. The package and command name is tofu.
Initialize and Apply
Enter the cloud-template directory, select a template, initialize provider plugins, and apply the configuration:
After reviewing the plan, run tofu apply and type yes to confirm. OpenTofu will then create VMs and related cloud resources.
Get IP Address
After creation, print the public IP address of the admin node:
Configure SSH Access
Global-cloud templates usually also provide an executable ssh_command output:
The repository’s ./ssh script is a compatibility tool for legacy templates whose outputs are all IP addresses and whose root password is PigstyDemo4. It iterates over the IaC outputs, treats them as IP addresses, writes them to ~/.ssh/pigsty_config, and distributes keys with sshpass. It is suitable for compatibility templates such as aliyun.tf, aliyun-full.tf, aliyun-oss.tf, and aliyun-pro.tf. Do not run it against modern templates that output ssh_command, private IPs, or access keys.
When using a compatible template:
If you want to use the configuration in ~/.ssh/pigsty_config, ensure your ~/.ssh/config includes:
Destroy Resources
After testing, you can destroy all created cloud resources with one click:
Terraform Compatibility and Migration
The directory and file names remain terraform/, .tf, terraform.tfvars, .terraform.lock.hcl, and terraform.tfstate because OpenTofu intentionally supports these compatibility names. Terraform remains available as an explicit compatibility option:
Use only one CLI in a working directory at a time. Before migrating existing state, preserve it and compare both plans:
Continue only when the OpenTofu plan contains the changes you expect. Never delete terraform.tfstate while reinitializing providers.
Template Specs
Pigsty provides multiple predefined cloud resource templates in the terraform/spec/ directory:
| Template File | Cloud Provider | Description |
|---|---|---|
aliyun.tf |
Alibaba Cloud | Single-node meta template, supports all distributions and AMD/ARM (default) |
aliyun-s3.tf |
Alibaba Cloud | Single node + private OSS bucket and RAM read/write credentials for S3/pgBackRest |
aliyun-full.tf |
Alibaba Cloud | Four-node sandbox, supports all distributions and AMD/ARM |
aliyun-oss.tf |
Alibaba Cloud | Six-node build template, supports all distributions and AMD/ARM |
aliyun-pro.tf |
Alibaba Cloud | Seven-node multi-distribution test template |
aws.tf |
AWS | Global AWS single node, Debian 12/13, AMD/ARM |
aws-cn.tf |
AWS | Legacy single-node environment for AWS China |
azure.tf |
Azure | Single node, Debian 12/13, AMD/ARM |
gcp.tf |
GCP | Single node, Debian 12/13, AMD/ARM |
qcloud.tf |
Tencent Cloud | Tencent Cloud single-node environment |
hetzner.tf |
Hetzner | Single node, Debian 12/13, AMD/ARM |
vultr.tf |
Vultr | Single node, Debian 12/13, currently AMD only |
digitalocean.tf |
DigitalOcean | Single node, Debian 12/13, currently AMD only |
linode.tf |
Linode | Single node, Debian 12/13, currently AMD only |
When using a template, copy the template file to terraform.tf:
Variable Configuration
Variables differ between templates. Alibaba Cloud templates support the full multi-distribution matrix and default to u26. Global AWS, Azure, GCP, Tencent Cloud, and Hetzner support Debian 12/13 with AMD/ARM selection and generally default to d12/amd64. Vultr, DigitalOcean, and Linode currently expose AMD instance choices only.
Architecture and Distribution
Resource Configuration
Alibaba Cloud templates expose the following resource parameters in a locals block. Other cloud templates use provider-specific instance, disk, and network variables or local values; consult the selected .tf file.
Alibaba Cloud Configuration
Credential Setup
Add your Alibaba Cloud credentials to environment variables, for example in ~/.bash_profile or ~/.zshrc:
Supported Images
The following are commonly used ECS Public OS Image prefixes in Alibaba Cloud:
The currently recommended and validated baselines are Rocky Linux 9.8 / 10.2, Debian 12.15 / 13.6, and Ubuntu 22.04.5 / 24.04.4 / 26.04.0.
| Distro | Code | x86_64 Image Prefix | aarch64 Image Prefix |
|---|---|---|---|
| CentOS 7.9 | el7 |
centos_7_9_x64 |
- |
| Rocky 8.10 | el8 |
rockylinux_8_10_x64 |
rockylinux_8_10_arm64 |
| Rocky 9.8 | el9 |
rockylinux_9_8_x64 |
rockylinux_9_8_arm64 |
| Rocky 10.2 | el10 |
rockylinux_10_2_x64 |
rockylinux_10_2_arm64 |
| Debian 11.11 | d11 |
debian_11_11_x64 |
- |
| Debian 12.15 | d12 |
debian_12_15_x64 |
debian_12_15_arm64 |
| Debian 13.6 | d13 |
debian_13_6_x64 |
debian_13_6_arm64 |
| Ubuntu 22.04.5 LTS | u22 |
ubuntu_22_04_x64_20G |
ubuntu_22_04_arm64_20G |
| Ubuntu 24.04.4 LTS | u24 |
ubuntu_24_04_x64_20G |
ubuntu_24_04_arm64_20G |
| Ubuntu 26.04.0 LTS | u26 |
ubuntu_26_04_x64_20G |
ubuntu_26_04_arm64_20G |
| Anolis 8.10 | an8 |
anolisos_8_10_x64 |
anolisos_8_10_arm64 |
| Alibaba Cloud Linux 3 | al3 |
aliyun_3_x64_20G_alibase_[0-9]+ |
aliyun_3_arm64_20G_alibase_[0-9]+ |
OSS Storage Configuration
The aliyun-s3.tf template additionally creates an OSS bucket and related permissions for PostgreSQL PITR backup:
- OSS Bucket: Creates a private bucket named
pigsty-oss - RAM User: Creates a dedicated
pigsty-oss-useruser - Access Key: Generates AccessKey and saves to
~/pigsty.sk - RAM Policy: Grants the user
oss:*permissions on the bucket and its objects for read/write use
AWS Configuration
Credential Setup
Both global and China-region templates can read standard AWS environment variables or credential files:
aws.tf reads ~/.ssh/id_rsa.pub by default. The legacy China-region aws-cn.tf instead reads this dedicated public key:
aws.tf uses a rolling lookup for official Debian AMIs. aws-cn.tf uses a hard-coded China-region AMI and ~/.aws/pigsty-key.pub; verify the target region, AMI, and key before deployment.
Tencent Cloud Configuration
Credential Setup
Add Tencent Cloud credentials to environment variables:
Tencent Cloud templates are community-contributed examples and may need adjustments based on your specific requirements.
Other Cloud Credentials
The GCP template also requires a project variable, for example tofu apply -var="project=my-project". Except for AWS China, current key-based templates read ~/.ssh/id_rsa.pub by default; edit the selected template to use another public-key path.
Shortcut Commands
Pigsty provides OpenTofu-first Makefile shortcuts. Set IAC_CLI=terraform explicitly to use Terraform instead.
For modern templates with ssh_command, private-IP, or other non-IP outputs, run tofu apply directly; do not use make u, which invokes the legacy ./ssh script afterward. Automatic confirmation is available only through deliberately named up-auto, apply-auto, and destroy-auto targets.
Notes
Cloud resources created with OpenTofu incur costs. After testing, promptly use tofu destroy to destroy resources to avoid unnecessary expenses.
It’s recommended to use pay-as-you-go instance types for testing. Templates default to using Spot Instances to reduce costs.
Alibaba Cloud and Tencent Cloud templates set the default root password to PigstyDemo4; Linode uses PigstyDemo4! to satisfy its password-complexity rules.
Current AWS, Azure, GCP, Hetzner, Vultr, and DigitalOcean templates primarily use SSH public-key authentication and do not share a default root password. Example passwords are for temporary tests only; change them or disable password login in production.
These templates target demonstration and development. Their current security groups or cloud firewalls allow all or nearly all inbound traffic from 0.0.0.0/0 (some also include ::/0), not just the ports Pigsty requires.
Restrict source networks and ports before deployment; do not use these defaults unchanged in production.
After creation, SSH login to the admin node using:
Alibaba Cloud templates that retain the legacy output and password conventions can also use ./ssh or make ssh to write SSH aliases. For other templates, use their ssh_command output.
8 - Security Considerations
Pigsty defaults target development, testing, and demonstrations on a trusted intranet. A production deployment must configure credentials, network boundaries, authentication, certificates, backup, and audit according to its threat model.
See Security and Compliance for mechanisms and boundaries, and the Launch Hardening Checklist for executable checks. ha/safe is a hardening example, not a substitute for reviewing each control.
Confidentiality
Critical Files
Protect these assets:
pigsty.ymland other inventories, which normally contain system and application credentials;files/pki/ca/ca.key, which can issue certificates trusted by the deployment;- the administration user’s SSH private key, which can use sudo on managed nodes by default;
- client-certificate private keys and backup-encryption keys;
- generated
/pg/tmp/pg-user-*.sqlfiles.
Restrict access to the admin node and configuration repository. Do not commit complete inventories or private keys to public repositories. Back up the CA private key and recovery configuration through controlled channels.
Passwords
Replace every public default credential before production. Start with:
This option does not replace the pgBackRest cipher_pass, every Silo example credential in ha/safe, or user-defined values. Review the result against the Default Credentials Checklist.
PostgreSQL stores newly set or updated passwords with SCRAM-SHA-256 by default. To enforce complexity, preload passwordcheck through pg_libs, or configure credcheck. Declare account lifetime with expire_in or expire_at.
Credential rotation must also update database users, the PgBouncer user list, component configuration, and client connection information. Prepare a rollback plan before rotating.
Network Boundaries
IP Addresses
PostgreSQL listens on 0.0.0.0 by default. To constrain listen addresses, set:
A listen address is not the only boundary. Production reviews should also cover:
- cloud security groups or upstream firewalls;
node_firewall_public_port;- whether
node_firewall_intranettrusts overly broad CIDRs; - PostgreSQL and PgBouncer HBA rules;
- the Patroni REST API allowlist.
The demo pigsty.yml inventory also exposes 5432 publicly. Remove that exception in production. If direct database access is required, limit it to explicit application CIDRs.
Network Traffic
- PostgreSQL enables server-side TLS by default, but default intranet HBA rules do not require it.
- PgBouncer TLS is disabled by default and controlled by
pgbouncer_sslmode. - HTTPS for the Patroni REST API is disabled by default and controlled by
patroni_ssl_enabled. - Nginx and the object-storage backend selected by the MINIO module enable HTTPS by default; etcd uses TLS for client and peer traffic.
HBA auth: ssl requires an encrypted connection only. Clients should also use sslmode=verify-full with a trusted CA to verify the database server; see Encrypted Communication.
Grafana, VictoriaMetrics, and other components may listen on node ports, but the default firewall does not expose them directly to public networks. Prefer Nginx for external access, and restrict management pages by source address and identity.
Authentication and Access Control
- Use HBA to define the user, database, source address, and authentication method. Avoid broad
worldrules. - Use
auth: certfor privileged remote users, with a process for delivering and revoking client certificates. - Assign application privileges through built-in roles; do not grant superuser to ordinary application accounts.
- Set
revokeconn: truefor multi-tenant shared clusters, and inspect effective database ACLs. - Create objects through the declared database owner or a controlled administration role so default privileges apply.
- To isolate offline queries, set
role: offlineexplicitly on the HBA rule fordbrole_offline.
After changing HBA, users, or roles, compare both the inventory and the effective database state.
Integrity
Pigsty enables page checksums by default to detect page damage after write. Checksums do not detect every memory error, logical error, or incorrect application write.
The CRIT template enables Patroni strict synchronous mode and more detailed connection logging. The synchronous mode targets preservation of acknowledged transactions, but depends on synchronous_commit, synchronous-replica state, and failover conditions. Writes block when no synchronous replica is available.
CRIT configures watchdog as automatic; it activates only when the system has a usable watchdog device. Decide whether required is appropriate according to hardware and availability requirements.
Availability
- Critical clusters should normally have at least three instances across independent failure domains.
- Connect through HAProxy, a VIP, or DNS service name instead of binding clients to a fixed primary address.
- Use an odd number of etcd nodes across independent failure domains.
- Remove single points of failure in INFRA, DNS, monitoring, and software repositories according to availability requirements.
- When using
pg_rpoandpg_rto, understand their configuration semantics and validate objectives through exercises.
Replicas handle only some node failures; they do not replace backups.
Backup and Recovery
- The local pgBackRest repository is not encrypted by default and shares a failure domain with the database host.
- The
pgbackrest_method: minioobject-storage repository uses AES-256-CBC by default, butcipher_pass: pgBackRestis public and must be replaced. pgBR.${pg_cluster}inha/safeis also an example and must not be used as the final key.- Store important backups in an independent failure domain, and evaluate object locking, versioning, or offline copies.
- Exercise full restore and PITR regularly to validate WAL, keys, recovery time, and application consistency.
See Data Security and Backup and Recovery for details.
Audit and Response
The default OLTP template logs DDL, slow queries, and PostgreSQL 18 connection-authorization events. CRIT also logs connection and disconnection events.
pgaudit must be installed, preloaded, and configured with an audit policy. Installing the package alone does not produce SQL audit logs. When Vector and VictoriaLogs are enabled, adjust log retention, access, and archive policy to requirements.
Metrics, logs, and alerts are incident inputs only. Production also needs alert classification, on-call ownership, incident determination, response, evidence collection, and post-incident review.
Host and Software Supply Chain
- Move SELinux from the default
permissivetoenforcingafter compatibility validation. - Disable unnecessary SSH password authentication and remote root login; consider a bastion host or multi-factor authentication.
- Review sudo scope for the administration and database OS users.
- Keep supported Pigsty and upstream component versions current.
- Verify the software-repository GPG key fingerprint and enable per-package signature verification where required.