# Single-Node Installation
> Get started with Pigsty—complete single-node install on a fresh Linux host!
---
LLMS index: [llms.txt](/llms.txt)
---
This is the Pigsty single-node install guide **Single Node**. For multi-node HA production deployment, refer to the [**Deployment**](/docs/deploy/) docs.
Pigsty single-node installation consists of three steps: [**Install**](#install), [**Configure**](#configure), and [**Deploy**](#deploy).
----------------
## Summary
[**Prepare**](/docs/deploy/prepare) a [**node**](/docs/deploy/prepare#node) with [**compatible OS**](/docs/ref/linux/), and run as an [**admin user**](/docs/deploy/admin) with nopass [**`ssh`**](/docs/deploy/admin#ssh) and [**`sudo`**](/docs/deploy/admin#sudo):
**Choose a Pigsty download mirror:**
```bash {tab="pigsty.io (Global)" group="download-mirror" value="global" copy="all"}
curl -fsSL https://repo.pigsty.io/get | bash
```
```bash {tab="pigsty.cc (China)" value="china" copy="all"}
curl -fsSL https://repo.pigsty.cc/get | bash
```
This command runs the [**install**](#install) script, downloads and extracts Pigsty source to your home directory and installs dependencies. Then complete [**Configure**](#configure) and [**Deploy**](#deploy):
### Enter the Source Directory
```bash {title="Terminal" copy="all"}
cd ~/pigsty
```
### Generate the Inventory
```bash {title="Terminal" copy="all"}
./configure -g
```
Skip this step if you already have a prepared `pigsty.yml`.
### Run the Deployment Playbook
```bash {title="Terminal" copy="all"}
./deploy.yml
```
After installation, access the [**Web UI**](/docs/setup/webui/) via IP/domain + port `80/443` through Nginx,
and access the default [**PostgreSQL service**](/docs/setup/pgsql/) via port `5432`.
The complete process takes 3–10 minutes depending on server specs/network. [**Offline installation**](/docs/setup/offline/) speeds this up significantly; for monitoring-free setups, use [**Slim Install**](/docs/setup/slim/) for even faster deployment.
**Video Example: Online Single-Node Installation (Debian 13, x86_64)**
----------------
## Prepare
Installing Pigsty involves some [**preparation work**](/docs/deploy/). Here's a checklist.
For single-node installations, many constraints can be relaxed—typically you only need to know your **IP address**. If you don't have a static IP, use `127.0.0.1`.
| Item | Requirement | Item | Requirement |
|:-------------------------------------:|:-----------------------------------------------|:-------------------------------------------:|:--------------------------------------------------------------|
| [**Node**](/docs/deploy/prepare#node) | **1-node**, at least `1C2G`, no upper limit | [**Disk**](/docs/deploy/prepare#disk) | `/data` mount point, `xfs` recommended |
| [**OS**](/docs/deploy/prepare#linux) | `Linux` `x86_64` / `aarch64`, EL/Debian/Ubuntu | [**Network**](/docs/deploy/prepare#network) | Static IPv4; single-node without fixed IP can use `127.0.0.1` |
| [**SSH**](/docs/deploy/admin#ssh) | `nopass` SSH login via public key | [**SUDO**](/docs/deploy/admin#sudo) | sudo privilege, preferably with `nopass` option |
{.full-width}
Typically, you only need to focus on your **local IP address**—as an exception, for single-node deployment, use `127.0.0.1` if no static IP available.
----------------
## Install
Use the following commands to auto-install Pigsty source to `~/pigsty` (recommended). Deployment dependencies (Ansible) are installed automatically.
**Choose a Pigsty download mirror:**
```bash {tab="pigsty.io (Global)" group="download-mirror" value="global" copy="all"}
curl -fsSL https://repo.pigsty.io/get | bash # Install current default version
curl -fsSL https://repo.pigsty.io/get | bash -s v4.5.0 # Pin current public stable release
```
```bash {tab="pigsty.cc (China)" value="china" copy="all"}
curl -fsSL https://repo.pigsty.cc/get | bash # Install current default version
curl -fsSL https://repo.pigsty.cc/get | bash -s v4.5.0 # Pin current public stable release
```
If you prefer not to run a remote script, you can manually [**download**](https://github.com/pgsty/pigsty/releases) or clone the source. When using `git`, always checkout a specific version before use.
```bash {title="Terminal" copy="all" label="Install Pigsty from Git"}
git clone https://github.com/pgsty/pigsty; cd pigsty;
git checkout v4.5.0; # Always checkout a released tag when using git
```
For manual download/clone installations, run the [**`bootstrap`**](/docs/setup/offline#bootstrap) script to install Ansible and other dependencies. You can also [**install them yourself**](/docs/setup/playbook#install-ansible).
```bash {title="Terminal" copy="all"}
./bootstrap # Install ansible for subsequent deployment
```
----------------
## Configure
In Pigsty, deployment blueprints are defined by the [**inventory**](/docs/setup/config/), the [**`pigsty.yml`**](https://github.com/pgsty/pigsty/blob/main/pigsty.yml) configuration file. You can customize through declarative configuration.
Pigsty provides the [**`configure`**](https://github.com/pgsty/pigsty/blob/main/configure) script as an optional [**configuration wizard**](/docs/concept/iac/configure),
which generates an [**inventory**](/docs/concept/iac/inventory/) with good defaults based on your environment and input:
```bash {title="Terminal" copy="all" label="Run the Pigsty Configuration Wizard"}
./configure -g # Use config wizard to generate config with random passwords
```
The generated config file is at `~/pigsty/pigsty.yml` by default. Review and customize as needed before installation.
Many [**configuration templates**](/docs/concept/iac/template/) are available for reference. You can skip the wizard and directly edit `pigsty.yml`:
```bash {title="Terminal" copy="all" collapse=6 label="Common configure Commands"}
./configure # Default template, install PG 18 with essential extensions
./configure -v 16 # Use PG 16 instead of default PG 18
./configure -c rich # Create local repo, download all extensions, install major ones
./configure -c slim # Minimal install template, use with ./slim.yml playbook
./configure -c app/supa # Use app/supa self-hosted Supabase template
./configure -c ivory # Use IvorySQL kernel instead of native PG
./configure -i 10.11.12.13 # Explicitly specify primary IP address
./configure -r china # Use China mirrors instead of default repos
./configure -c ha/full -s # Use 4-node sandbox template, skip IP replacement/detection
```
The output below is from the current `main` branch (v5.0.0-preview). If you install another version, the first line reports that version.
> [!DETAILS]- Current main branch configure output
> ```console {title="configure output" copy="command" collapse=12 label="configure Example Output" num="1" caption="Example configure output from the current main branch" #configure-output}
> vagrant@meta:~/pigsty$ ./configure
>
> configure pigsty v4.5.0 begin
> [ OK ] region = default
> [ OK ] kernel = Linux
> [ OK ] machine = x86_64
> [ OK ] package = rpm,dnf
> [ OK ] vendor = rocky (Rocky Linux)
> [ OK ] version = 9 (9.6)
> [ OK ] sudo = vagrant ok
> [ OK ] ssh = vagrant@127.0.0.1 ok
> [WARN] Multiple IP address candidates found:
> (1) 192.168.121.24 inet 192.168.121.24/24 brd 192.168.121.255 scope global dynamic noprefixroute eth0
> (2) 10.10.10.12 inet 10.10.10.12/24 brd 10.10.10.255 scope global noprefixroute eth1
> [ IN ] INPUT primary_ip address (of current meta node, e.g 10.10.10.10):
> => 10.10.10.12 # <------- INPUT YOUR PRIMARY IPV4 ADDRESS HERE!
> [ OK ] primary_ip = 10.10.10.12 (from input)
> [ OK ] admin = vagrant@10.10.10.12 ok
> [ OK ] mode = meta (el9)
> [ OK ] locale = C.UTF-8
> [ OK ] configure pigsty done
> proceed with ./deploy.yml
> ```
**Common configure Arguments**
- `-i | --ip` — `IPv4`
The primary private IP of the current host, used to replace the `10.10.10.10` placeholder in the inventory.
- `-c | --conf` — `string`
A [**configuration template**](/docs/conf/) name relative to `conf/`, without the `.yml` suffix.
- `-v | --version` — `integer`
PostgreSQL major version `14` through `19`; PG19 is Beta, so use the dedicated [`pg19`](/docs/conf/pg19/) template.
- `-r | --region` — `enum`; default: `default`
Upstream repository region for faster downloads: `default`, `china`, or `europe`.
- `-n | --non-interactive` — `boolean`; default: `false`
Use command-line arguments for the primary IP and skip the interactive wizard.
- `-x | --proxy` — `boolean`; default: `false`
Use current environment variables to configure [`proxy_env`](/docs/infra/param#proxy_env).
If your machine has multiple IPs bound, use `-i|--ip ` to explicitly specify the primary IP, or provide it in the interactive prompt.
The script replaces the placeholder `10.10.10.10` with your node's primary IPv4 address. Choose a static IP; do not use public IPs.
> [!WARNING] Change default passwords!
> We strongly recommend modifying default passwords and credentials in the config file before installation. See [**Security Recommendations**](/docs/setup/security/) for details.
--------
## Deploy
Pigsty's [**`deploy.yml`**](/docs/setup/playbook/) [**playbook**](/docs/setup/playbook/) applies the blueprint from [**Configure**](#configure) to target nodes.
```bash {title="Terminal" copy="all" label="Run the Pigsty Deployment Playbook"}
./deploy.yml # Deploy the defined modules in the core path at once
```
> [!DETAILS]- Example deployment output
> ```console {title="deploy output" copy=false collapse=10 label="Pigsty Deployment Output"}
> ......
>
> TASK [pgsql : pgsql init done] *************************************************
> ok: [10.10.10.11] => {
> "msg": "postgres://10.10.10.11/postgres | meta | dbuser_meta dbuser_view "
> }
> ......
>
> TASK [pg_monitor : load grafana datasource meta] *******************************
> changed: [10.10.10.11]
>
> PLAY RECAP *********************************************************************
> 10.10.10.11 : ok=302 changed=232 unreachable=0 failed=0 skipped=65 rescued=0 ignored=1
> localhost : ok=6 changed=3 unreachable=0 failed=0 skipped=1 rescued=0 ignored=0
> ```
>
> When you see `pgsql init done`, `PLAY RECAP` and similar output at the end, installation is complete!
> [!WARNING] Upstream repo changes may cause online installation failures!
> Upstream repos used by Pigsty (like Linux/PGDG repos) can sometimes enter a broken state due to improper updates, causing deployment failures (this has happened multiple times)!
> You can wait for upstream fixes or use pre-made [**offline packages**](/docs/setup/offline#offline-packages) to solve this.
> [!WARNING] Avoid re-running the deployment playbook!
> Warning: Running [**`deploy.yml`**](https://github.com/pgsty/pigsty/blob/main/deploy.yml) again on an existing deployment may restart services and overwrite configurations!
--------
## Interface
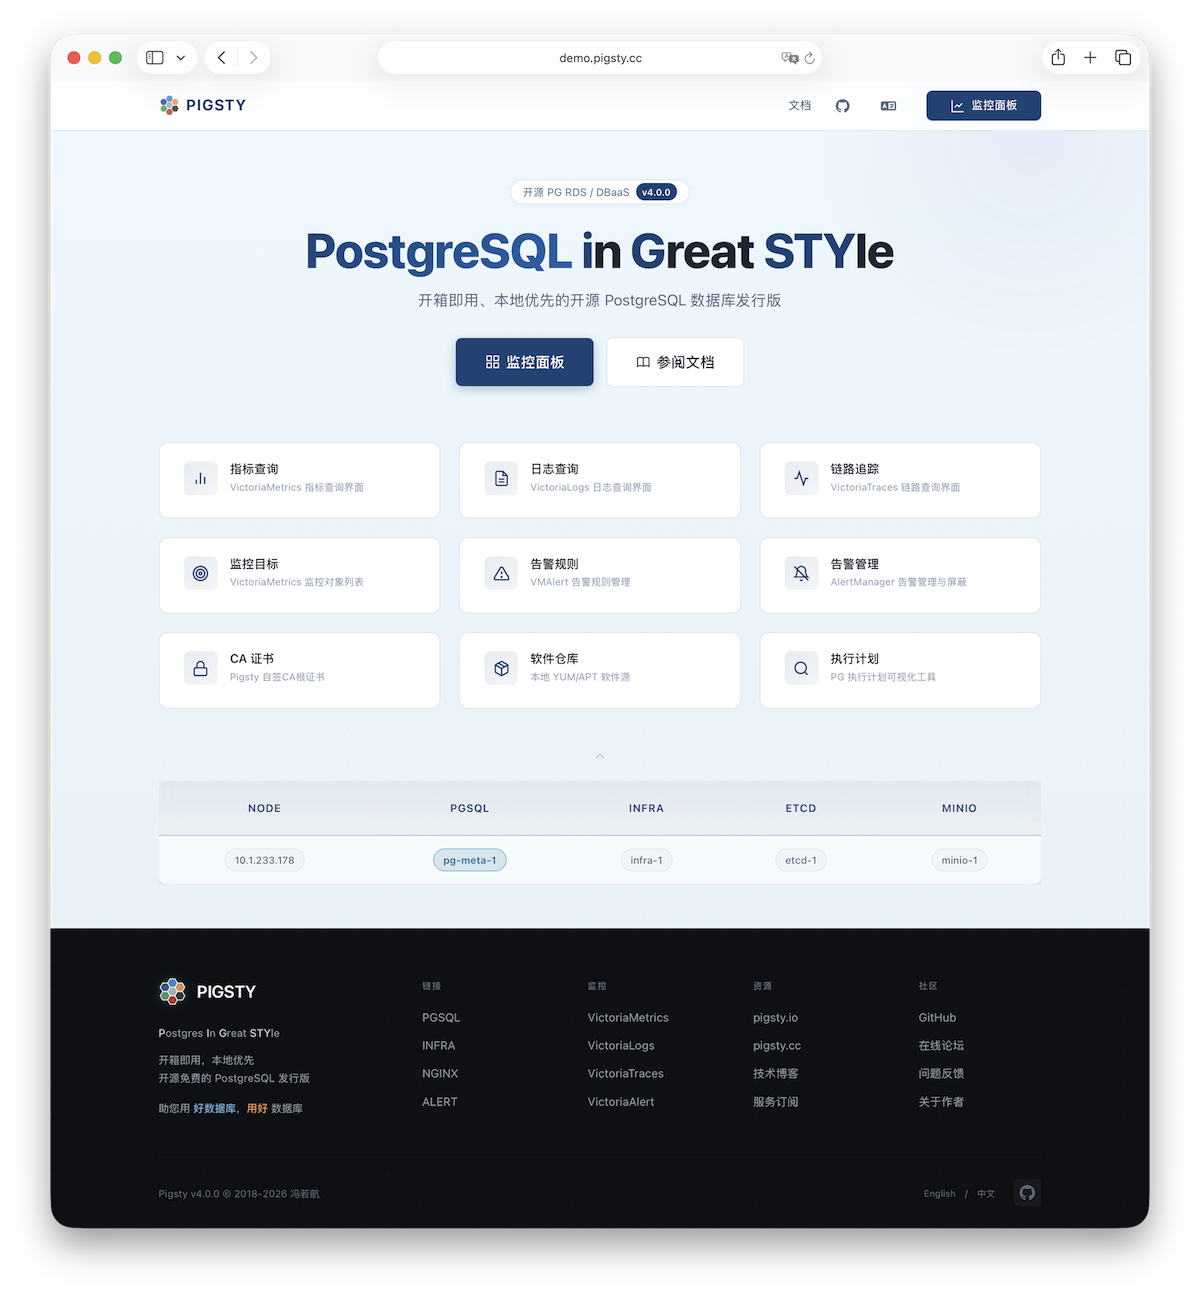
After single-node installation, you typically have four modules installed on the current node:
[**`PGSQL`**](/docs/pgsql/), [**`INFRA`**](/docs/infra/), [**`NODE`**](/docs/node/), and [**`ETCD`**](/docs/etcd/).
| ID | [NODE](/docs/node/) | [PGSQL](/docs/pgsql/) | [INFRA](/docs/infra/) | [**ETCD**](/docs/etcd/) |
|:--:|:-------------------:|:---------------------:|:---------------------:|:-----------------------:|
| 1 | `10.10.10.10` | `pg-meta-1` | `infra-1` | `etcd-1` |
{.full-width}
The [**`INFRA`**](/docs/infra) module provides a [**graphical management interface**](/docs/setup/webui), accessible via Nginx on ports **80/443**.
The [**`PGSQL`**](/docs/pgsql/) module provides a [**PostgreSQL database server**](/docs/setup/pgsql), listening on **5432**, also accessible via Pgbouncer/HAProxy [**proxies**](/docs/pgsql/service).
[](https://demo.pigsty.io/)
----------------
## More
Use the current node as a base to deploy and monitor [**more clusters**](/docs/conf/full): add cluster definitions to the [**inventory**](/docs/setup/config/) and run:
```bash
bin/node-add pg-test # Add the 3 nodes of cluster pg-test to Pigsty management
bin/pgsql-add pg-test # Initialize a 3-node pg-test HA PG cluster
bin/redis-add redis-ms # Initialize Redis cluster: redis-ms
```
Most modules require the [**`NODE`**](/docs/node/) module installed first. See available [**modules**](/docs/ref/module/) for details:
[**`PGSQL`**](/docs/pgsql/), [**`INFRA`**](/docs/infra/), [**`NODE`**](/docs/node/), [**`ETCD`**](/docs/etcd/),
[**`MINIO`**](/docs/minio/), [**`REDIS`**](/docs/redis/), [**`DOCKER`**](/docs/docker/)……